West Coast Brewer Home Brewing Blog

Category: Home Beer Brewing Techniques

Home Brewing

Home Brew #homebrew

Home Brew #homebrew


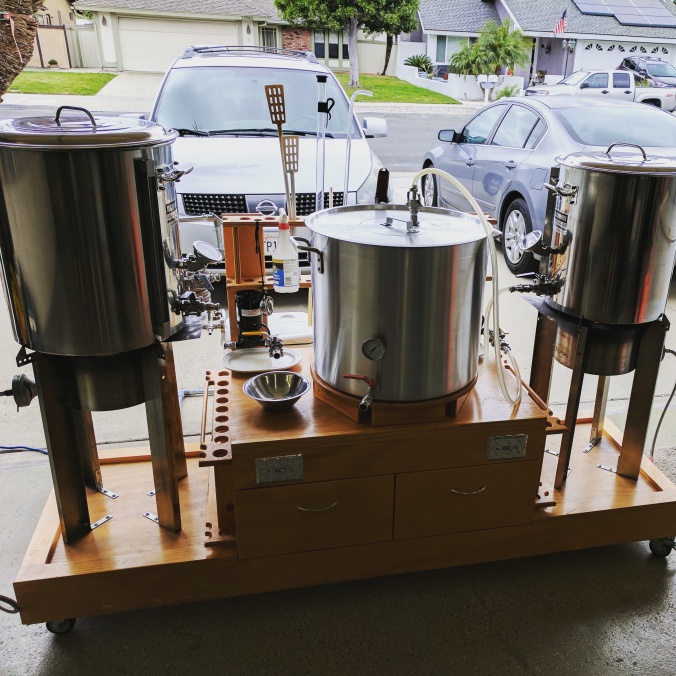
Recently I had the pleasure of brewing up a batch of home brew on one of my friends home brewing system. I always look forward to the opportunity to get another home brewers perspective on home brewing. I find that I learn a lot about the home brewing craft from examining other home brewers methods and practices.  Even better, both of us use similar home brewing hardware and like similar styles of beer so we can share home brew recipe tips as well.


Home Brewing Rig

Home Brewing Rig


One of the biggest differences in our home brewing systems and our beer brewing practices is when it comes to the mash. Where I have made my mashing process complicated (possibly over complicated) over time, doing my best to make sure my mash is at a specific temperature for the entire 60 minutes, he sets his mash temp, closes the lid and does not attempt to correct for any temperature loss over time.  By the time his mash has completed, the temperature in his tun has only dropped by approximately 6F.


My concern with a drop in mash temp would be that perhaps the finished beer would come out too dry or thin due to the lower average mash temp, the starches would only be converted to very simple sugars. Yet after sampling several of his beers, that did not turn out to be the case. I sampled 4 of his beers that day, varying from stouts to IPA’s and all of them were fantastic.  I would not describe any of his beers as too thin or too dry.


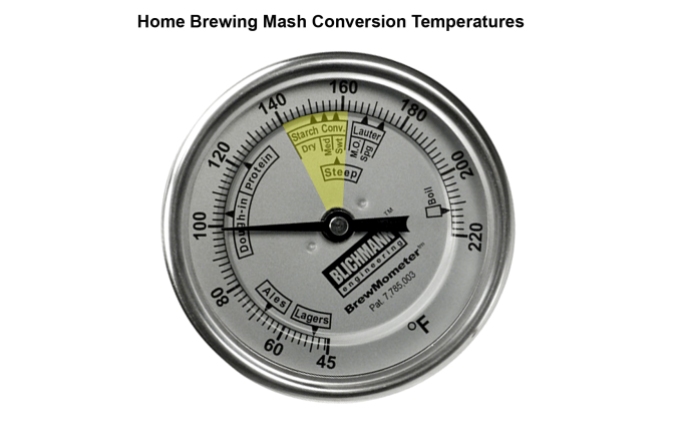
Home Brewing Mash Conversion Temperatures

Home Brewing Mash Conversion Temperatures


The image above is of my Blichmann BrewMomerter. I hi-lighted the segment that pertains to the mash conversion. As all grain home brewers, for the most part we mash at between 150-152 F to get a well rounded mash conversion. When I asked my friend if he was concerned with the temp dropping, he said that he felt that most of the starch conversion was occurring early in the mash process while his temperature was on target and that he had never noticed a degradation in the quality of his finished beer since he started conducting his mash in this manner. I am inclined to agree with him based on the high quality beer that he produces.


I think that sometimes as home brewers, out of our desire to brew “perfect” beer, sometime we go too far and over complicate things (or at least I do).  I am not saying to ignore your mash temperature or to only mash for 10 minutes. My point is more that modern varieties of beer have been produced for over 600 years, well before yeast was even discovered in 1857. Considering that our ancestors created beer with out having the benefit of such instruments as a Blichmann BrewMometer, perhaps there can be some flexibility when it comes to brewing.


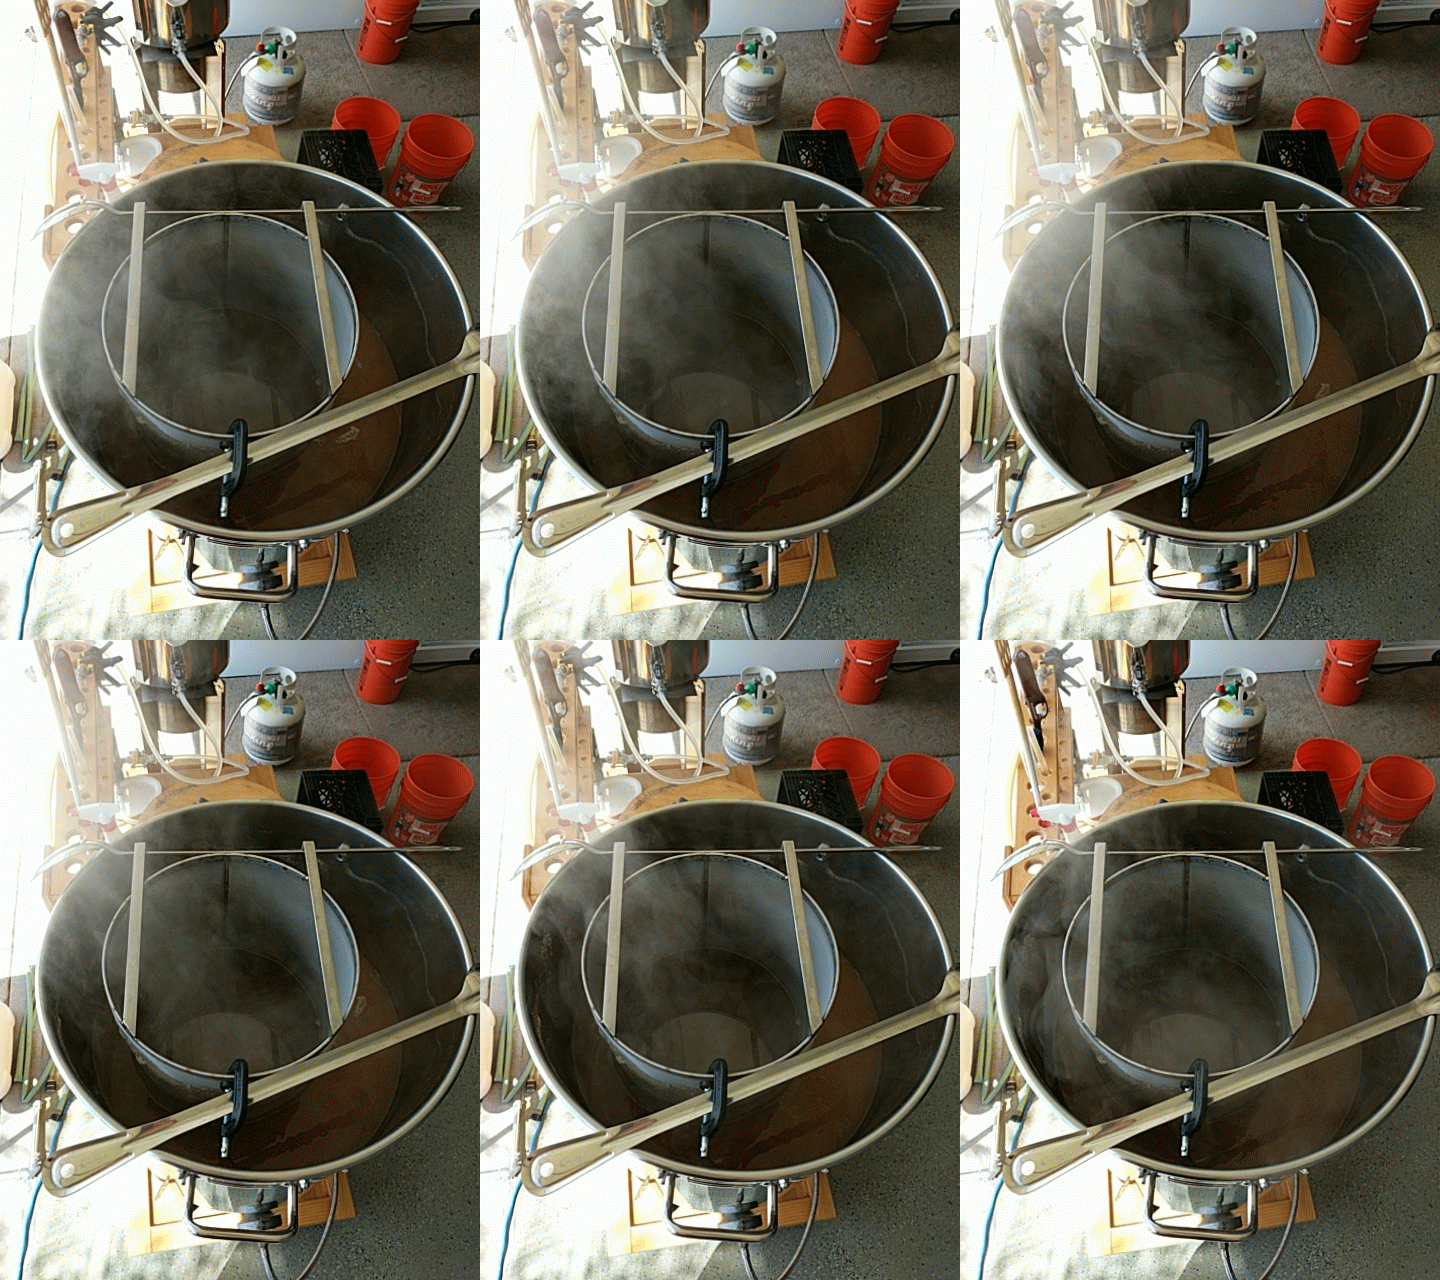
One of the home brewing items that he possess that I am pretty envious of is a large sized stainless steel hop spider.  When I say large sized, I mean large sized, this thing is giant as you can see from the animated image.  The photos were taken during the whirlpool process after the boil had completed. I have been trying to get a hop filtering system to work out on my home brew system for the last few batches with out a great deal of success.  I have been trying to overcome some challenges with clogging issues in my hop filter and he shared some great advice with me.  He said that in order for a hop filter to work properly and to get similar hop utilization compared to not using one, you need to have a hop filter that is at least half the diameter of your home brewing kettle. The size of the filter made a dramatic difference. I could see the wort moving around inside of his filter and he had hardly any clogging issues.


Home Brewing With A Hop Spider Animation

Home Brewing With A Hop Spider

I look forward to brewing with him again to see what else I can pick up from him. He has mastered the art of the Hazy IPA so I hope to pick his brain on that next.
Labor Day Homebrew Sale!

Labor Day Promo Code Homebrew Supply

Labor Day Promo Code Homebrew Supply

HomebrewSupply.com Coupon Codes and Promotional Code


Labor Day Sale For HomebrewSupply – Homebrew Supply
Promo Code for the Month of  September 2016
Homebrew Promo Code Date: 9-4-2016 to 9-5-2016
Coupon Details: Labor Day Homebrewing Sale – Save 15%
Homebrew Supply Coupon Code: LABOR15

Coupon Description: Happy Labor Day! Right now you can save 15% on your home brewing orders and get flat rate shipping!  Homebrew Supply is having a big sale right now to celebrate Labor Day and with coupon code LABOR15 you can save yourself 15%! These guys are great if you have not used them before for your homebrew equipment and supply needs.  They have a good and growing inventory and ship fast!


Click Here for this HomeBrew Supply Labor Day Coupon


Found at HomebrewingDeal.com


Chalkboard Beer Tap Handle Sale

Chalk Board Beer Tap Handle

Chalk Board Beer Tap Handle


HomebrewSupply.com Coupon Codes and Promotional Code

Limited Time Sale Coupon For HomebrewSupply.com – Homebrew Supply
Promo Code for the Month of  August 2016
Promo Code Date: 8-9-2016
Promotion Details: $35 Chalkboard Beer Tap Handle

Right now Homebrew Supply is having a big sale that can save you some money on homebrewing equipment and supplies.  For instance they currently have a home brewing chalkboard beer tap handle for just $35!  So if you are looking for a great way to let your guests know what beers are on tap without having to purchase a different tap handle for each beer you brew, this is the tap for you! This chalkboard tap handle is perfect for any kegerator or keezer. This makes a great gift for any home brewer!  I am not too sure how long this sale will last so you may want to act fast!


Click Here for this HomeBrew Supply Chalk Board Beer Tap

A brilliant new home brewing device!

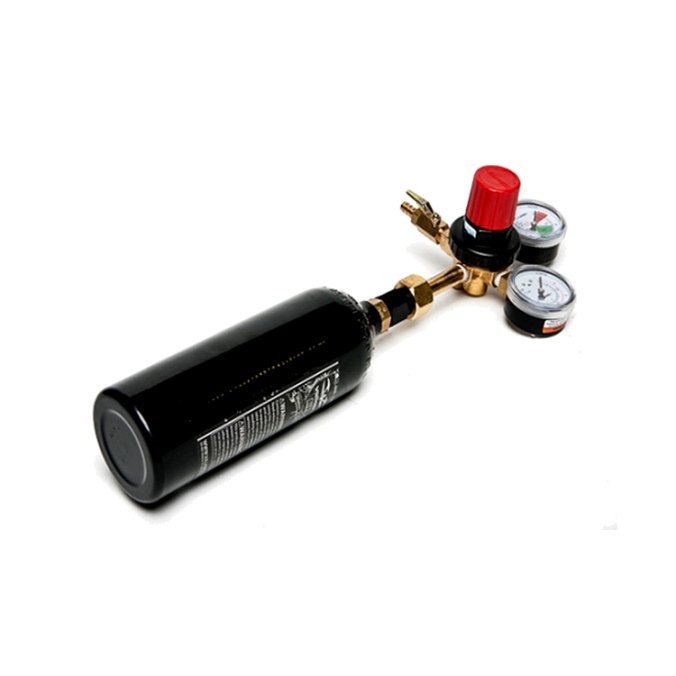
Paintball CO2 Tank to Home Brewing Keg Converter Kit $9.99

Paintball CO2 Tank to Home Brewing Keg Converter Kit $9.99

From Adventures in Home Brewing

I came across this awesome new home brewing device and thought I would share it in case anyone could use it! Adventures in Homebrewing has release a paintball CO2 tank to home brewing keg converter kit. The paint ball co2 tank to keg adapter is made of anodized aluminum and allows you to attach a paintball CO2 tank to your existing keg system CO2 regulator. This brilliant device makes the portability of your home brewed beer a snap. Best of all, it is currently on sale for just $9.99.


To take advantage of this home brewing promotion, use the coupon code listed above if applicable and click on the following link:


Click Here for this Paintball to Homebrewing CO2 Tank Adapter Kit

Adding a Ball Valve to a Kettle, Fermenter or Cooler

Home Brewing Weldless Ball Valve Kit

Home Brewing Weldless Ball Valve Kit

Adding a ball valve to a homebrewing kettle, cooler or conical fermenter is now a simple and inexpensive task thanks to this More Beer stainless steel homebrewing ball valve kit. Do you have a stainless steel home beer brewing kettle or homebrew cooler and would like the ease and convenience of using a ball valve to drain liquid? Well, at just a fraction of the cost of having a spigot welded into your kettle you can install a weldless ball valve yourself with out worry of leaks.
These new weldless home brewing ball valve kits  are designed for beer brewing and are no comparison to the weldless fittings of yesterday. This homebrewing ball valve kit is also unique in that it feature 1/2″ female threads on the inside. This allows you to thread in various other fittings that you can see below. Want to later make a mashtun… no problem just thread in our stainless screen. want to fully drain your boil kettle? No problem, just add our kettle maximizer! This allows for unlimited flexibility. Best of all, they are easy to install.  I have in fact installed two my self with out any issues.  I recommend using a step drill bit to make things super easy. This weldless home brewing valve kit includes a 1/2″ Full Port ball valve and a 1/2″ barb. All fittings are made from 304 type stainless steel for a lifetime of corrosion free use. Complete installation directions are also included with this homebrewing ball valve kit.
If you are ready to install one now, More Beer currently is running a special on them and you can pick one of these 1/2″ ball valve kits up for just $26 and if not, they regularly sell for $34 which is still a bargain if you ask me.

Click here for more details on this kit More Beer Ball Valve Kit

The Anatomy of a Brew Rig

Homebrewing_Rig


Here is the most recent image of my home brewing rig.  I recently added a whirlpool arm and switched back to an immersion chiller shown in the image.  Aside from that I just replaced some switches in my RIMS controller.  I thought that I would post an shot of my current gear in case it helps anyone else with their design.  If you have any question on my homebrewing setup please feel free to reach out to me.


Tips for making a great pumpkin beer!

Brewing a Great Pumpkin Beers

Brewing a great pumpkin beer


There are two types of pumpkin beers out there, great ones and terrible ones. Brewing up a great pumpkin beer can be easy if you know what you are doing and I have put together a few tips to help you out if you are brewing up your first batch of pumpkin homebrew!


1) Most importantly, start with a great base beer recipe!

Pumpkin Beer Recipe Kits are great because they take all of the guess work out of it and the good ones are well balanced when it comes to pumpkin flavors. There are a bunch of great pumpkin beer recipe kits out there including these ones which are two of my favorites:

 MoreBeer Pumpkin Beer Recipe Kit

Great Pumpkin Charlie Brown Ale

But if you want to design your own recipe, make sure that you start with a great base beer that will showcase your pumpkin beer well. I personally enjoy the malty flavor of darker beers for a pumpkin ale, like a nice brown ale.  I also try to keep the ABV down if it will be for a party where people will be enjoying several pints. The following is a great kit to start with, just make sure you pay attention to tip #2.

Nut Brown Base for a Great Pumpkin Beer


2) Highly important, DO NOT over hop your pumpkin beer!

Trust me on this, I have made this mistake in the past.  The last thing that you want is for your hops to compete against the pumpkin and spice flavor in your beer.  The hops should just add a very subtle bitterness to your beer. I would recommend an IBU of around 10 – 20 for a pumpkin ale, but it will depend on the estimated ABV of your beer so that it is balanced.  If you use the Nut Brown Ale listed above, you may want to consider halving the amount of hops used.


3) This is pretty important too, DO NOT over spice your pumpkin beer!

Okay, so I may have made this mistake in the past as well. You do not want your pumpkin beer to taste like someone accidentally dropped a spice rack in your kettle.  A great pumpkin beer is flavorful but not overpowering.  I will leave the quantity of pumpkin spice that you use up to you, but will give you this advice.  You can always add more!  What I do is add a moderate amount of spice at the start of fermentation and then add the spice to taste at the end of fermentation.  I will slowly add more spices to the fermenter and sample the beer until I am pleased.  Since I keg, I will even sometimes add additional spice to the keg once the beer has been conditioned if I feel that it is lacking in flavor.


4) This is kinda important, DO NOT rush your pumpkin beer!

Pumpkin beer is just like every other beer that a home brewer creates, it requires time to properly ferment and condition. If it is 7 days before your Halloween party and you are thinking of brewing a pumpkin beer for it, you may want to brew a Thanksgiving pumpkin beer instead.  Give yourself at least a month.  Make sure your ferment at an appropriate and  stable temperature that is right for your yeast and give your beer time to properly carbonate, clear and condition.


5) I guess this is important as well, if you are going to use fresh pumpkin, then use pie making pumpkin, not your sons Jack-o-lantern.

So there are different types of pumpkins out there, the type you carve, the miniature type that is the size of a muffin and the type that you make pie out of.  If you want to go all Martha Stewart on me and use a fresh pumpkin, then make sure that you use a pie making pumpkin and not some little ornamental pumpkin or some giant jack-o-lantern style pumpkin that you got from a bin in front of Walmart. If you use fresh pumpkin, clean and cut the pumpkins flesh into cubes.  Bake those cubes at a low temperature (about 325 F) until the cubes become nice and soft and start to brown.  If you are not an over achiever, I use Libby’s Pumpkin Pie mix and add 2 large cans per 5 gallons of beer.


6) Okay, so this is really important, add your pumpkin to secondary fermentation!

There is much global debate in the world on when to add your pumpkin to your brew, in the mash or at fermentation.  I personally add it at the tale end of primary fermentation,  I simply add my Libby’s pumpkin pie mix and pumpkin pie spice to a clean fermenter and transfer the beer onto it.  I allow the beer to complete fermentation for an additional 2 weeks or so and then cold crash for another week before racking to a keg.


7) This is not too important, give your beer a cool and festive name!

Some brewers enjoy naming their beer as much as they enjoy brewing it.  If this is you then go for the gold!  If you come up with a good one, I would love to hear it.


How to Brew a Great Lager!

How to brew a great lager!

home brewing lager beers

How to brew a great lager


For the most part home brewers tend to start out brewing ales and stick to them since ales ferment faster, tend to be a bit more versatile than lagers and do not require you to keep your home at the temperature of a morgue if you want to ferment your beer in your closet.  Not to mention, most home brewing supply shops tend to release far more ale recipes than lager recipes and relatively few craft breweries even have a lager in their beer lineup.


So why brew a lager?  Because lagers are awesome! They are crisp and clean, delicious to taste and beautiful to look at!  In fact, some of the worlds best beers are lagers. Not to mention, lagers were session beers before session beers were even a thing, which means you can throw back a few lagers while brewing a batch of beer and not be so tipsy that you forget to add your hops to the brew kettle or pitch your yeast in the fermentor.  And do not go thinking that a lager has to be some low IBU (International Bittering Unit) grandma beer.  Several breweries have been crafting beers like IPL’s India Pale Lagers and other non traditional lager styles that will make you rethink what a lager is.


Brewing Lagers

Brewing Lagers


Now that we have that squared away, lets start at the beginning. What is the difference between a lager and an ale?  Lager is the German word meaning storage or to store.  As in, “Kann ich bitte lager meine Essiggurke in Sie” or “Can I please store my pickle in you”.  The Germans called a lager a lager because they would cold store the beer for several weeks as it fermented and after it fermented, creating an exceptionally clean and crisp beer.  That does not mean that you can just place your ale in a closet for 6 weeks and all the sudden have yourself a lager.  A lager is fermented with a lager yeast as opposed to an ale yeast.  Lager yeast is different from ale yeast in a few ways.  For one thing lager yeast conducts most of its fermentation at the bottom of the fermentor as opposed to an ale which does so at the top of the fermentor. Most importantly is the temperature at which the fermentation occurs. While the ideal fermentation temperature for most ale yeast strains is right at about 68 F, the ideal temperature for most lager yeast strains is about 50 F, which means you better buy a jacket with your lager recipe kit if you are going to ferment in your living room.


So how do you brew a great lager?  To start with, you are going to need a great recipe kit.  Lagers can be pale or dark, do not let all of the typical mass brewed American lagers skew your understanding of what a lager is or can be.  A couple of great lager examples are Vienna lagers which are a beautiful amber color with a rich malty taste and a Munich Helles which has a pale golden color with a mild bitterness.


You can find some great lager home brewing kits here: Home Brewing Recipe Kits


Next you will want to select the ideal yeast strain for your style of lager. You can find a fantastic selection of lager yeasts here. If you can not decide which to go with, the Munich 2308 is usually a safe bet.  You can pitch these yeast packages directly into your fermentor but I recommend that you create a yeast starter for a few reasons.  Most importantly it will allow you to confirm that the yeast is alive and healthy, it will allow the yeast to return to an active state so that it can begin reproducing and fermenting immediately when placed in contact with your lager wort and lastly it will boost the yeast cell count to help insure a fast and complete fermentation takes place.


If you do not have access to a fermentation chamber such as a temperature controlled chest freezer, refrigerator or fermentor setup such as this one Brew Bucket Temperature Controller, you will want to make sure that you brew your lager during a time of the year where the average temperature that you ferment your beer will be approximately 50 F.  If it is much colder than that your fermentation process will slow to a crawl or cease all together, if it gets much higher your lager will ferment to fast and is likely to create unwanted off flavors .  You can also use items like an electric blanket and a temperature control unit such as this one Ranco Digital Temperature Controller, to help regulate your fermentation temperature.  Consult your specific lager yeast strain packing to find the ideal fermentation temperature as they can differ.  Keep in mind that patience is a virtue when it comes to brewing a lager and if you take your time you will more than likely be rewarded with a better beer!


In order to create the best tasting lager possible you will need to reduce or eliminate one of the more common off flavors in a lager which is diacetyl. To do so, you should perform a diacetyl rest at the end of your primary fermentation. Dicaetyl is described as tasting like butter and some popcorn manufactures use it as an artificial flavor for their microwave popcorn.  While it may make your popcorn taste better, it should be avoided in your lager and is something that your yeast will produce during fermentation.  The good news is that your yeast can also remove it! If at the end of your primary fermentation you allow your fermentation temperature to increase from 50 F to 55 F for a few days, the yeast will naturally begin to eliminate the dyacetyl from your beer.  After the three days you will want to reduce your fermentation temperature to 50 F once again.


One of the most important characteristics of a lager is its clarity and brightness!  For that reason, I suggest that you conduct a 2 stage fermentation and “lager” or store your beer in a secondary fermentor after primary fermentation has completed and the yeast and solids have consolidated on the bottom of your fermentor.  Primary fermentation will typically have completed in about 3 weeks or so but take gravity readings to be sure. Racking your beer off of the expended yeast, residual hop matter and fallen proteins will also help prevent off flavors from forming in your lager as your beer ages in the secondary fermentor. I would suggest allowing your beer to age for an additional 2 to 4 weeks in secondary fermentation.  During the final week of secondary fermentation I will typically cold crash my fermentor down to 38 F which encourages any fine particulates and residual yeast cells to drop out of the beer and consolidate on the bottom of the fermentor.  I then rack the beer to a keg and let it slow carbonate and condition for another week or so before enjoying!


Best of luck to you in brewing your lager and let me know if you have any suggestions that you would like to share with other West Coast Brewer visitors!


Joe


Dry Hopping Your IPA

How to Dry Hop Beer

How to Dry Hop Beer


Lately, with the trend of craft breweries moving towards ultra hoppy, high IBU IPA’s; home brewers need to be on their game if they want their home brewed beer to stand up to what the breweries are releasing. One of the greatest advantages that a home brewer has over a craft brewery is freshness.  As beer ages the potency of hop bitterness and aroma diminishes and that is accelerated by heat and oxidation. Since a home brewer does not need to contend with their beer sitting in a hot warehouse during distribution or having the sun beat down on their bottles in a stores showcase, you should do your best to take advantage of your beers freshness.  Always do your best to store your beer in a cool dark place if possible.


Whole Citra Hops

Whole Citra Hops


Another way to make the most of your IPA’s freshness is to dry hop.  The reason a brewer dry hops their beer is to impart the beer with fragrant and fresh hop aroma.  Since the beer is cool when the hops are added, the oils from the hops will not be infused with the beer and they will pass on little to no bitterness. Dry hopping is typically conducted once primary fermentation has completed and the hops are typically left in contact with the beer for between 7 and 14 days.  The hops are usually added after primary fermentation has completed so that less CO2 is being produced and the hop aroma can stay in contact with the beer as opposed to being carried out of the fermentor with the escaping CO2.  I personally like to use whole hops for dry hopping, but pellet hops can be used as well. When the beer is ready to be transferred to a keg or bottle, the beer is siphoned as normal and the hops are left behind in the fermentor to be discarded.  I typically add about 2 ounces of hops for every 5 gallons of beer, but more can be added if desired.

Seven Easy Ways to Improve Your IPA!

7 Easy Ways to Improve Your IPA

7 Easy Ways to Improve Your IPA


Recently I came across a great article (5 Tips for Better IPAs) from the American Homebrewers Association where they interviewed Vinnie Cilurzo (Owner and Brewer at Russian River Brewing) and he gave 5 recommendations on how fellow brewers can improve their IPA’s.  I thought that I would take some of Vinnie’s fantastic advice and expand on it a bit with a few of my own suggestions!


Here are 7 easy ways on how you can improve your Home Brewed IPA!


 1) Every Beer Starts with Water!


Never under estimate the importance of beers primary ingredient, water.  The water that you are using to make your beer is critical, especially when it comes to all grain brewing.  Water plays an important part in everything from the taste and the mouth feel of a beer to the sugar conversion and acidity in a finished beer.


If you are using city water that has been treated with chlorine, always make sure that you are removing the chlorine with a carbon filter or alternative method.  It is also a good idea to check your city’s water report to see if you are lacking or have an over abundance of minerals in your water that may be impacting your beer.  Vinnie suggests treating your water with gypsum in both your mash and your boil to heighten the hop flavor of your beer.  You can also use low level sodium additions to have a similar effect.  Before making these additions you should first examine your existing levels to make sure that it will not detract from the quality of your finished beer.


2) Dry Hop Until You Just Can’t Dry Hop Anymore!


Unlike adding hops early in the boil, dry hopping adds little to no bitterness to the finished beer but what it does add is a strong and fresh hop aroma!  When dry hopping beer, I always recommend adding the hops after the airlock has stopped bubbling in fermentation.  That ways the escaping CO2 will not carry the hop aroma out of the fermentor along with it.  Vinnie suggests adding multiple dry hop additions at different times which may deliver additional hop aroma to your finished IPA!


3) Do Not Rush Your Fermentation!


We all want to try out our latest beer as quickly as possible, but there is allot to be said for patience in home brewing!  If you have the ability to temperature control your fermentation, set the temp between 65F to 67F.  Yeast loves a low stable temperature and produces far less off flavors than at higher temps.  It will take longer to ferment at a lower temperature but your beer will come out cleaner tasting so that your robust hop profile can really shine in the finished beer!  Also, cold crash your beer once your fermentation has completed.  Try to crash at around 36F for 2 weeks if possible.  This will help force any residual yeast out of suspension and leave you with a cleaner tasting and clearer beer!


 4) Don’t Skimp On the Yeast!


Now a days home brewers have a huge variety of options when it comes to yeast.  If you want your beer to be as good as possible, then you are going to have to use the best and most suitable yeast for the style of beer that you are brewing.  A great West Coast IPA yeast strain is the White Labs WLP001 Ale Yeast, available here.


Make sure that you create a yeast starter, insuring viability and that you pitch a sufficient quantity of yeast for the strength of beer that you are brewing.


5) Do Not Overload Your Beer With Crystal or Malty Grains!


Vinnie suggests that you add crystal malts sparingly to your grain bill. He remarks that the sweet flavors and aromatics derived from those grains can compete with the flavors and aromas of your hops.  An IPA is a showcase for the hops and the other ingredients should complement them not detract from them.


6) Consider Adding Hop Resin Extract to Your Boil!


Pure hop resign extracts can be a great way of boosting the bitterness of your wort with out having to add an extreme amount of hop additions to your boil.  Just like with actual hops, in order for the bitterness to be captured by the wort, the hop resign still needs to be boiled in the wort for a sufficient amount of time.


7)  Opt For a Dryer Beer!


A dryer  beer can really help the hops in your IPA stand out!  Vinnie suggests supplementing approximately 5% of your grain bills sugars with dextrose. Dextrose is a very simple sugar that yeast can easily ferment.  Another option would be dropping your mash temp down by a degree or two in order to create less complex sugars during the mashing process.


If you are looking to try your hand at one of Russian River’s IPAs, you can find a couple of excellent kits available here:


Russian River Blind Pig IPA Kit


Russian River Pliny the Elder Home Brewing Recipe Kit


Good luck and happy brewing!