West Coast Brewer Home Brewing Blog

Tag: fermenter (Page 1 of 2)

MoreBeer.com Black Friday Sale Going On Now! Save Up To 50% On Home Brewing Gear!

The MoreBeer.com Black Friday Home Brewing Sale

Limited time and quantity More Beer Coupon
More Beer Coupon Codes for the Month of November, 2017
Coupon Code Date: 11-24-2017 Only
Promo Code Details: More Beer Black Friday Sale! Save Up To 50%!
Promo Code: MORE BEER BLACK FRIDAY SALE

Coupon Code Description:  This is hands down the best home brewing sale day of the year and More Beer has some incredible homebrew deals going on right now, plus you will get FREE SHIPPING on orders over $59!  One of the highlights today is their home brewing deal on a GRAIN FATHER home brewing system! Today Only, SAVE $200 + FREE SHIPPING! This is the  Bluetooth Connected All Grain Brewing System Version as well with all of the bells and whistles.

Grain Father Promo Code #homebrew #homebrewing #beer #brewing #System #GrainFather

Grain Father Promo Code #homebrew #homebrewing #beer #brewing #System #GrainFather

Save up to 50% During the More Beer Black Friday Sale on a variety of home brewing items including More Beer’s temperature controller Conical Fermenter!


Black Friday Homebrew Sale

Plus save a bundle on other home brewing items like stainless steel conical fermenters, home brewing starter kits, wort chillers, mash paddles and more!
Click here for to take advantage of this limited time coupon code from MoreBeer:

MOREBEER.COM BLACK FRIDAY SALE


Home Brewing Coupon Code Found At:  HomeBrewingCupon.com


CORNICAL

Blichmann Cornical - Keg Based Homebrewing Fermenter

Cornical Fermenter

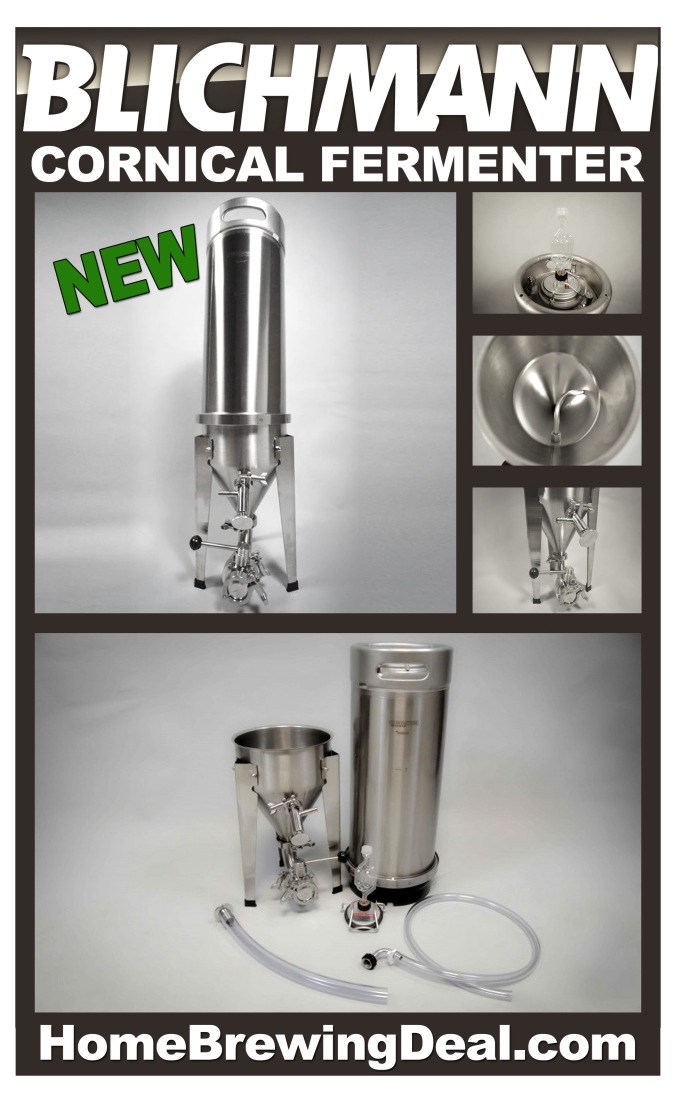
Blichmann has done it again! They just released their new Cornical Fermenter based homebrew fermenter. The Cornical is the latest fermentor from Blichmann who has a long history of creating top quality home brewing fermenters. The Cornical is made from two main pieces; the first being a modular home brewing keg with a removable base. The modular design makes cleaning it a snap. The second part of the Cornical is a stainless steel conical bottom that attaches to the keg turning it into a homebrewing fermentor. Unlike most homebrewing fermenter, the Cornical is rated all the way up to 50 psi, allowing a home brewer to carbonate right in the fermenter. When fermentation finished, if desired you can replace the bottom of the keg and serve right from the Cornical. The modular design allows you to use the conical bottom to ferment another batch on a different keg while you drink your first batch!  Here are some of the features of the Blichmann Cornical Home Brewing Fermenter:
  • Built from stainless steel
  • Both a keg and a fermenter
  • Keg made in Italy, Cone and legs made in USA,  assembled in USA
  • Ferment, carbonate, and serve beer from one vessel
  • Modular design to allow use as both a fermenter and a serving keg
  • Removable bottom makes cleaning simple and fast
  • Rotating racking arm with sanitary sampling and racking valve
  • Full 1.5” sanitary butterfly dump valve allows for yeast harvesting and trub clean out
  • Sanitary stainless steel fittings for contamination free beer
  • Pressure capable to 50psi for carbonation and beer dispensing
  • Easy to use lid hatch for dry hopping and secondary additions

For additional information or to purchase a Cornical fermenter, click the following link. MoreBeer offers some of the best prices for Blichmann products like the Cornical and free shipping!

Click Here For More Details Or To Purchase A Cornical Fermenter

Homebrewing Product Information Found At:

HomebrewingDeal.com

#homebrew #homebrewing #homebrewer #beer #brewing #home #brewing #brewer #deal #more #beer #morebeer.com #Blichmann #Cornical #Fermenter #Fermentor #Keg

Stainless Steel Homebrewing Fermenters

Homebrewing Stainless Steel Conical Review

Homebrewing Stainless Steel Conical Review


I own 4 different stainless steel homebrewing conical fermenters at this time:

2 Stainless steeel brew buckets


7 gallon SS BrewTech stainless steel conical fermenter 


14 gallon stainless steel conical fermenter


Prior to purchasing these home brew fermenters I tended to use glass carboys but would also use a plastic carboy on occasion. Often times I get asked if they are worth the money?  For me I can quickly and honestly answer yes! The main reason is they are more durable and I do not have to worry about dropping one of my glass carboys anymore and having it send me to the hospital.  I also got them for a great deal, or at least what I consider a great deal.  I picked the stainless steel brew buckets up for $195 each, the 7 gallon for $395, and the 14 gallon for $495. There are a few more reasons why I like them so much.


They are constructed from 100% stainless steel, so if I care for them they will last a life time. Since these homebrew fermenters are built from metal, it also means that I do not need to worry about light oxidization while the wort or beer is in it. They are incredible easy to clean. If I want to I can transfer via CO2 pressure.  My 14 gallon unit has a temperature control unit which makes fermenting an ale or a lager a breeze regardless of the time of year. My stainless brew buckets and 7 gallon conical fermenter all fit in my fermentation fridge and allow me to ferment about 18 gallons of beer as opposed to 10 gallons if I was still using my glass carboys! Dry hopping these are a snap since their lids come off, which make they a snap to clean as well.  The conicals come with a thermowell built in and the stainless brewbuckets have a add-on kit for them as well; that makes monitoring temperature easy if you have a temp controller and fermentation chamber since it give you an actual temperature reading of the fermenting beer as opposed to the outside of the fermenter or ambient chamber temp which may be off by several degrees.


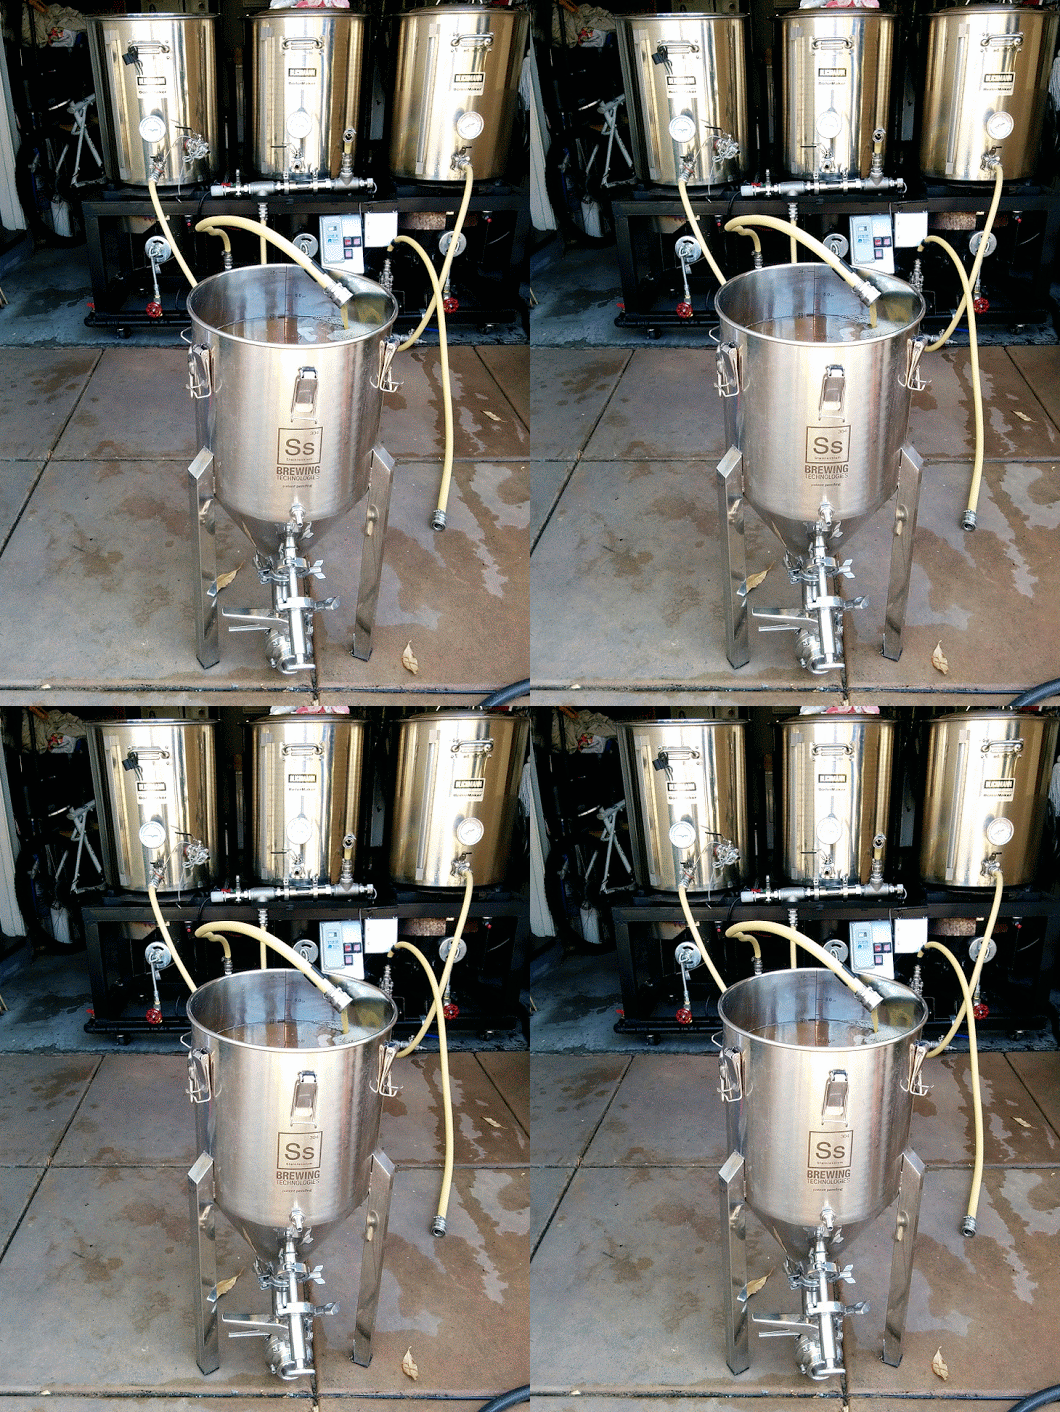
Filling mt 7 gallon stainless steel homebrew conical fermenter

Filling mt 7 gallon stainless steel homebrew conical fermenter

As you can see, filling the conical is as easy as it gets.  It even has easy to read gallon markers etched into the inside wall of the fermenter.  As you can see there are two ports on it.  One for dumping large volumes from the base of the conical or harvesting yeast (which is simple and can save you some money) and a second transfer and tracking arm port for siphoning beer above the sediment and or yeast bed.


Transferring beer from the stainless steel home brewing brew bucket fermenter.

Transferring beer from the stainless steel home brewing brew bucket fermenter.


As you can see in the above photo, transferring beer from the stainless steel brew bucket is about as easy as it gets. It has a single port and rotating internal racking arm that makes transferring clear beer to the keg as easy as turning a valve.  No more sanitizing siphons with these fermenters. Having less things to worry about or to clean is always a plus when it comes to home brewing.


Home Brewing Conical Fermenters

Home Brewing Conical Fermenters


As I had mentioned earlier, cleaning these fermenters in very easy.  I simply use some PBW, warm water and a nylon scrub sponge.  The lid comes off so it is easy to reach everything and the conical fermenters come with sanitary clamps so they break down and reassemble effortlessly. I have used these fermenters for over 3 years now and still do not have one complaint about them!


If you are interested in picking one up, here are the links and best of all, they are shipped free!


7 Gallon Stainless Steel Brew Bucket $195


7 Gallon Stainless Steel Conical Fermenter $395


14 Gallon Stainless Steel Conical Fermenter $495


The above listed stainless brewbucket is currently on a promotional deal.  It regularly sells for $225, so if you were looking to purchase one then now may be a great time!

Digital Homebrewing Fermentation Monitoring System on Sale!

Beer Bug Home Brewing Internet Based Monitoring System

Beer Bug Home Brewing Internet Based Monitoring System

Limited time and quantity promo code from MoreBeer.com – MoreBeer
Promo Codes for the Month of September 2016
Coupon Code Date: 9/5/2016
Promotion Details: Save $40 on a Digital Homebrew Monitor was $199
Promo Code: BEERDEAL
Coupon Code Description: MoreBeer currently has a coupon code that will save you $40 on a Digital Homebrew Monitor! The Beer Bug is a fantastic piece of homebrewing equipment that measures the actual specific gravity, ABV and even temperature of your fermenting homebrew beer every minute. It then compiles the homebrew data and sends that information to your own free online account. It makes it super easy for you to log on at the TheBeerBug.com or via an internet based app on your phone to see exactly how your fermentation is doing from anywhere! In fact, this homebrewing technology has three graphs that are created for each of your beers to log how specific gravity, alcohol %, and temperature changed over the course of the fermentation. The Beer Bug gives you the knowledge to make better beer and saves you time! Understanding what happens during fermentation, and how to control it, is often what separates good brewers from great brewers. The Beer Bug is the tool that gives you the information you need to know things like if your fermentation temperature inside the chamber is too high or too low, when fermentation is nearing completion so that you can prepare to dry hop, keg or bottle and even what the lag time is on your beer is.


Here are the specs on the Beer Bug, digital home brewing monitor with web interface:

  • Fits just about any fermentation vessel
  • Actual gravity sensor hangs from your BeerBug into your beer and can be lengthened or shortened to accommodate any vessel
  • Sends information via your local WiFi network
  • Rechargeable battery in the homebrew monitor has a 25 day charge life
  • Free account on TheBeerBug.com
  • Easy to setup and configure
  • Android and iOS Apps available for your phone or tablet
  • Software upgrades will automatically be sent to your Beer Bug via WiFi as released

Click Here For This MoreBeer Coupon Code


Found this at: HomebrewingDeal.com

Adding a Ball Valve to a Kettle, Fermenter or Cooler

Home Brewing Weldless Ball Valve Kit

Home Brewing Weldless Ball Valve Kit

Adding a ball valve to a homebrewing kettle, cooler or conical fermenter is now a simple and inexpensive task thanks to this More Beer stainless steel homebrewing ball valve kit. Do you have a stainless steel home beer brewing kettle or homebrew cooler and would like the ease and convenience of using a ball valve to drain liquid? Well, at just a fraction of the cost of having a spigot welded into your kettle you can install a weldless ball valve yourself with out worry of leaks.
These new weldless home brewing ball valve kits  are designed for beer brewing and are no comparison to the weldless fittings of yesterday. This homebrewing ball valve kit is also unique in that it feature 1/2″ female threads on the inside. This allows you to thread in various other fittings that you can see below. Want to later make a mashtun… no problem just thread in our stainless screen. want to fully drain your boil kettle? No problem, just add our kettle maximizer! This allows for unlimited flexibility. Best of all, they are easy to install.  I have in fact installed two my self with out any issues.  I recommend using a step drill bit to make things super easy. This weldless home brewing valve kit includes a 1/2″ Full Port ball valve and a 1/2″ barb. All fittings are made from 304 type stainless steel for a lifetime of corrosion free use. Complete installation directions are also included with this homebrewing ball valve kit.
If you are ready to install one now, More Beer currently is running a special on them and you can pick one of these 1/2″ ball valve kits up for just $26 and if not, they regularly sell for $34 which is still a bargain if you ask me.

Click here for more details on this kit More Beer Ball Valve Kit

Stainless Steel Conical Fermenters for $395

Stainless Steel Conical Homebrewing Fermenters

Stainless Steel Conical Homebrewing Fermenters


Rejoice home brewers, right now you can pick up a high end SS BrewTech 7 gallon stainless steel conical fermenter for just $395! These are high end and well build stainless steel conical homebrewing fermenters, not some Alibaba knock off with leaky valves.


Here are some of the standard features on this conical fermenter:

  • Certified Food Grade 304 Stainless Steel Construction
  • Patent Pending Stainless Steel Rotating Racking Arm
  • 7 Gallon Capacity
  • 1.5” Tri Clamp bottom with Elbow and 3 piece Ball Valve
  • Stackable design minimizes footprint and maximizes ferment space!
  • Molded Silicone Gasket for airtight Lid seal.
  • Six Spring-Loaded Lid Clamps hold Lid in place
  • Volume Markers inside for easy volume assessment
  • TIG Sanitary Welds – Easy to Clean, Long-lasting!


Click Here For the 7 Gallon Stainless Steel Fermenter


These stainless steel conical fermenters are loaded with features and I personally have two of them, a 7 gallon and a 14 gallon. I also have 2 of their 7 gallon brew bucket stainless steel fermenters which are also great.  In my opinion they are the best fermenters out there for the money.  I would recommend upgrading the racking arm on the unit to the MoreBeer Racking Arm system which you can find here for $75 and is shown in the above image on my fermenter.


I cut down the legs in this 7 gallon conical fermenter so that it could fit in my fermentation chamber / chest freezer. My 14 gallon conical fermenter has an internal temperature control system.  The 14 gallon unit is currently on sale for $495 and is available here.


7 Gallon Conical Fermenter

7 Gallon Conical Fermenter

Blichmann Fermenator Conical Fermenter Sale at MoreBeer

Blichmann Fermentator Conical Fermenter Sale

I just purchased a couple of conical fermenters and now it seems like all that I do is blog about conicals.  Well, this will be my last for a while, well at least until next week because I am just finishing up my temperature control unit and plan on posting some photos about that. I had to write this one because right now MoreBeer has a huge sale on Blichmann 7 gallon, 14 gallon and 27 gallon Fermentator conical fermenters currently going on.


Blichmann 7 Gallon Fermenator Conical Fermenter

Blichmann 7 Gallon Fermenator Conical Fermenter


Right now, you can get this 7 gallon Blichmann stainless steel conical fermenter for only $499

Click Here for the 7 Gallon Conical Fermenter Sale


Blichmann 14 Gallon Fermenator Conical Fermenter

Blichmann 14 Gallon Fermenator Conical Fermenter


Right now, you can get this 14 gallon Blichmann stainless steel conical fermenter for only $533

Click Here for the 14 Gallon Conical Fermenter Sale


Blichmann 27 Gallon Fermenator Conical Fermenter

Blichmann 27 Gallon Fermenator Conical Fermenter


Right now, you can get this 27 gallon Blichmann stainless steel conical fermenter for only $707

Click Here for the 27 Gallon Conical Fermenter Sale at MoreBeer


Blichmann is known for their high quality homebrewing products and they have not compromised their standards on their conical fermenters.  They are some of the best stainless steel conicals available to home brewers. These Blichmann stainless steel conical fermentors features a weld-free interior, a dump valve for removing yeast and sediment, and a rotating racking arm for clearn beer transferring. Prior to bottling or kegging your home brew, you can dump your yeast and trub out of the bottom valve, making for a very clean transfer and giving you the ability to harvest your yeast. The lid has a removable hatch that is pressure capable, allowing you to easily transfer using CO2 to minimize air exposure and oxidation.

Click Here To See All Of The Deals


How to install a thermowell

How to install a thermowell in a stainless steel brew kettle or fermentor.

How to Install a Thermowell

How to Install a Thermowell


I live in Southern California and it is not unusual for me to get daily temperature deviations of more than 30 degrees depending on the time of the day.  As you can imagine, this makes regulating fermentation temperatures a bit of a nightmare.  So about a year and a half ago I purchased a chest freezer to use as a fermentation chamber.  The chest freezer greatly helped in creating a more stable environment for my fermentation but I was taping the temperature probe of my digital thermostat to the side of my carboy or fermentor and that was not giving me a true reading of the actual temperature of the fermenting beer. As beer ferments, especially during times of high yeast activity a good amount of heat is created inside the fermentation vessel which means that the temperature of the beer can differ significantly from the ambient temperature of your fermentation chamber.  If the temperature in your fermentation vessel gets to high, your yeast may begin to create off or undesired flavors in your beer.  Since the heat produced by yeast activity changes significantly over the course of fermentation, simply compensating by moving the thermostat temperature down a few degrees is not ideal.  For this reason, many home brewers choose to either purchase a fermentor with a thermowell built in or add a thermowell to their fermentor.


A thermowell is a hollow thin walled tube that reaches from the outside wall of the fermentor to a near center point of the inside of the fermentor.  The hollow chamber of the thermowell allows you to insert a thermostat temperature probe so that you can get a far more precise reading of the actual temperature inside of the fermentation vessel.


For my fermentation vessel I use a 7 Gallon Stainless Steel Brew Bucket.  If is far less expensive than some of the higher end stainless steel fermentors but unfortunately it does not come with a thermowell built in.  That being said, it still costs a couple hundred dollars and the last thing that I wanted to do was ruin it by improperly installing a termowell. After doing a little research I was able to install the thermowell with no issues and it only took me about 20 minutes to do.  The tools that I used were a center punch, hammer, electric drill, 2 small drill bits, step drill bit, crescent wrench and a little fine grit sand paper.


How to Install A Thermowell Step1

How to Install A Thermowell Step1


First things first, you will want to gather your tools and mark the point on your fermentor where you want to place your thermowell.  The thermowell should be near the center of the fluid level of your filled fermentor.  Also consider that if you prepare different sized batches in your fermentor, you will want to place the thermowell so that it will be able to read the temperature of small batch sizes as well, so it may make sense to place the thermowell a little lower in the fermentation vessel.  After you mark your installation spot on your fermentor, you will want to use a punch or sharp instrument to make a starting point for when you drill your pilot hole.


Thermowell Installation Step 2

Thermowell Installation Step 2


Next you will want to drill your pilot hole as shown in the image above.  In my situation I actually increased the size of the initial pilot hole with a slightly larger drill bit to help accommodate the head of my step drill bit.


Thermowell Install Step 3

Thermowell Install Step 3


I then used my step drill bit to increase the diameter of the hole until the thread of my thermowell was  able to enter it snugly.  Once I verified that it was able to enter, I used the fine grit sand paper to remove any sharp metal and to polish the edges of the drilled hole.  Next I mounted the thermowell, making sure to use the included silicone o-ring.


Thermowell Step 4

How to Install a Thermowell Step 4


Lastly I cleaned the fementor and thermowell and tested it to insure that there were no leaks.  The install was a success and I currently have a batch of beer in it and the thermowell is working well as expected!


If you are looking to either purchase a fermentor or a thermowell for an existing fermentor, here is where I purchased mine.


Click Here for Fermentors and Thermowells


MoreBeer.com 14 Gallon Conical Fermentor

Stainless Steel Conical Fermenter


When I come across a great deal I like to pass on the information.  For today only MoreBeer.com is offering one of their high quality 14 gallon Stainless Steel fermentors at a serious discount.  Typically they run for $995, but today, while supplies last, you can pick one up for only $835.00


Click Here for this Special Offer on a 14-Gallon Stainless Steel Conical Fermentor


The MoreBeer.com Stainless Steel Conical Fermenter features:

– 304 Stainless Steel
– 1.5 inch butterfly valve
– Threadless racking arm with position indicator
– Professional sanitary sample and transfer valve
– Removable cone for easy cleaning
– Domed lid with 3 inch clover fitting at the top
– Sturdy lid clamp allowing for 5 PSI of pressure (with addition of CO2 Adapter pack)
– Ability to add options such as leg extensions, wheels and blow off


Reusing beer yeast and how to harvest and clean your beer yeast.

Reusing and harvesting beer yeast

Reusing and harvesting beer yeast

While cleaning out your fermenter have you ever wondered if you could reuse the yeast that has collected on the bottom?  The answer is yes, you certainly can!  You can actually often reuses your yeast 4 or 5 times with out the likelihood of having any ill effects from mutations or high quantities of alternate yeast strains impacting the flavor of your beer.  Yeast isn’t cheap at around $7-$10 for a vial of the good stuff, so you might as well get your moneys worth!


Here are some basic things to consider when reusing your home brewing yeast.  

It is best to reuse the yeast as soon as possible.  You will probably want to consider discarding it after approximately 6 months.  If you are pitching the yeast more than 30 days after harvesting it from your fermenter, I would recommend creating a starter with it to help insure viability.


Only reuse your yeast 4-5 times.  Each time you reuse the yeast, mutations will occur and the probability of alternate yeast strains impacting the flavor of your beer will increase.


Do not reuse the yeast if the ABV of the beer that you harvested it from exceeds 6.5%.  High alcohol levels weaken and destroy your yeast.


Do not reuse yeast from a heavily hopped beer.  Like with alcohol, an over abundance of hops (from a dry hopped IPA for instance) will diminish the longevity and potency of your yeast.


Do your best to avoid harvesting the trub along with your yeast.  This is most easy accomplished via a conical fermenter. It is also possible transfer the yeast slurry and then rinse and decant your yeast with sanitized water to separate it from the trub.


Harvesting Beer Yeast

Harvesting Beer Yeast


Yeast should be stored at approximately 36 F in a sanitized vessel.  Keep in mind that even at that temperature the yeast may still be active and can create CO2.  So beware as your container may explode if too much fermentable sugar remained behind in your harvested yeast solution and the vessel is unable to vent the pressure.


If you are interested in purchasing a conical fermenter or yeast harvesting cylinder; many options can be found here:

Conical Fermenters and Yeast Harvesting

Stainless Steel Fermentors for Home Brewing

Stainless Steel Conical Fermenter

Stainless Steel Fermentor


I have good news for my fellow home brewers.  If you have always wanted a stainless steel fermentor for your home brewing setup but have been scared away from making the purchase by either the cost or the size than this might be the fermentor for you.


Last month MoreBeer.com released these new 7 gallon stainless steel conical fermentors and I picked up 2 of them.  They currently retail for $225.  There are several things that I like about these stainless steel fermentation buckets.  First off is that they are small enough where the still fit in the chest freezer that I use as a fermentation chamber.  Secondly, they have strong handles on the side that permit you to carry and move them around when they are full.  Something that would be far more tricky with a larger 14 gallon conical stainless steel fermentor.  Another thing that is great is that they have volume markers engraved into the side of the fermentor which is awesome!


Stainless Steel Fermenter

Stainless Steel Fermenter

Perhaps the best thing about this stainless steel fermentor is that it wont crack, chip, break or possibly shatter if you drop it and embed large shards of glass into your leg!  In most cases this will also make the need for a racking cane obsolete.  It is also larger than standard carboys! With its plus sized 6.95 gallon capacity you wont have to worry much about head space during high krausen on a 5 gallon batch. Lastly what I like about it is that it is far easier to scrub than a carboy since the large lid comes off so that you have full access to the inside of the fermentor.  Honestly about the only thing about a carboy that I miss is being able to watch the fermentation take place.  It would also have been nice to have another valve on the very bottom so that you could remove trub or harvest yeast from the fermentor.  Those two points aside, if you are looking to purchase a reasonably priced, high quality stainless steel fermentor or stainless steel brew bucket as they call this, than this is a great choice.


You can purchase this stainless steel fermentor here:

Stainless Steel Fermenter


Beer Home Brewing on a Budget

I thought it might be helpful if I created a list of must haves if you are considering getting into home brewing, but do not want to spend a lot of money on gear until you know how much you will enjoy it.


If you are just starting out, you will want to begin with extract brewing. In extract brewing, the starches from grains have already been extracted and converted to sugar for you. To make things even easier, most home brewing supply stores and online vendors will have ready made extract home beer brewing kits that will provide you with all of the ingredients you will need.  I advise that you start with an ale since they are lower maintenance than lagers and are typically ready to drink much sooner.


Here is what you will need to get started home brewing beer:


1) Large Pot – You’ll need this to boil your home brewed beer. The larger the better, but at least 3 gallons in size if you’ll be making a 5 gallon batch of beer. You will need to add additional water after your wort has been boiled to dilute it to 5 gallons if you do not have a large enough pot to boil the entire batch.


2) Fermentation Vessel – You’ll need a glass or plastic fermentation carboy, or a plastic bucket with a drilled hole airlock. The fermenter needs to be sanitized and airtight, but it has to allow the massive amount of CO2 that is being created during fermentation to escape. I highly recommend you purchase either a carboy or bucket built for fermentation as opposed to making your own unless you are very handy. If wild yeast or bacteria gets into your fermenting beer, it can quickly ruin a batch.


3) Airlock – As mentioned above, you will need an airlock for your fermenter.


4) Cleaner and Sanitizer – Cleanliness is rule number one when it comes to home brewing. Anything that will come in contact with the wort or beer after boiling must be cleaned and sanitized first to avoid contaminating the wort or beer. Every item should be cleaned properly and then rinsed of any soap or cleaning residue. Next, the item should be sanitized using either an iodine or acid-based solution to ensure that it is free of any germs, bacteria, or foreign fungus/yeast. You can use a food grade cleaner that you have around the house, just make sure that all of the residue is removed, as it can impact the taste of your finished beer. I recommend you purchase a food grade sanitizer if possible.


5) Siphon and Siphon Tube – You will want to purchase a siphon and siphon tube to allow you to transfer your beer from primary to secondary fermentation if you will be conducting a two stage fermentation. You can also use it to transfer the finished beer to your bottles.


6) Bottles – If you want to save money, you can collect beer bottles and reuse them to bottle your own beer. Be sure that the bottles are properly cleaned and sanitized prior to bottling.  You will want to avoid screw cap bottles, and if you can find them, latch top bottles are ideal since they do not require capping.


7) Bottle Caps and Beer Bottle Capper – You need to purchase an appropriate amount of beer bottle caps and a beer bottle capper so that you can bottle your beer when it has been finished.


8) Thermometer – You will also want a cooking grade thermometer to check your temperatures.


9) Beer Ingredient Kit – Lastly, you will need to choose a beer ingredient kit for the type of beer you want to make. I recommend starting with something simple that you really enjoy drinking. My first kit was an American Wheat extract kit. It was very easy to brew and it came out wonderful, way better then I expected it would. Beer always seems to taste better when you brew it yourself!


There are a variety of other items that will come in handy, such as a large paddle to stir with, a funnel, a wort chiller, and secondary fermenter; but for your first batch, you should be able to get by with the items listed above. I have included some links for home brewing recipe kits and home brewing equipment kits that will provide you with all that you need to get started at a reasonable price.


Home Brewing Equipment Kits:

Home Brewing Equipment Kits

Home Brewing Beer Recipe Kits:

Home Brewing Beer Recipe Kits


Photo of a home brewing recipe kit and home brewing equipment:

Home Beer Brewing

Home Beer Brewing

« Older posts