West Coast Brewer Home Brewing Blog

Tag: homebrew (Page 4 of 10)

MoreBeer.com Promo Code – Save 10% On Some Of MoreBeer’s Most Popular Home Brewing Items

Save 10% On MoreBeer.com's Most Popular Home Brewing Items Including Pliny the Elder Beer Recipe Kits!

Save 10% On MoreBeer.com’s Most Popular Home Brewing Items Including Pliny the Elder Beer Recipe Kits!

Promo Codes for the Month of March, 2017
Coupon Code Date: 3-1-2017 to 3-2-2017
Promotion Details: Save 10% On MoreBeer.com’s Most Popular Home Brewing Items
Promo Code: TOP15Coupon Description: Right now, MoreBeer has a promo code that will save you 10% On MoreBeer.com’s Most Popular Home Brewing Items Including Pliny the Elder Beer Homebrew Recipe Kits! They have some really great items on sale including stainless steel mash paddles, PBW home brewing cleaner, stainless steel home brewing pumps, Speidel Homebrewing Fermenters and much more!

Also More Beer offers Free Shipping on orders over $59, so you can save big right now!

MoreBeer.com Coupon Codes and Promo Codes


Home Brewing Coupon Code Found At:  HomeBrewingCoupon.com

Brewer’s Edge Homebrewing System

Brewers Edge Homebrewing System #homebrew #homebrewing #brewers #edge #brewersedge

Brewers Edge Homebrewing System #homebrew #homebrewing #brewers #edge #brewersedge


Brewers Edge Mash & Boil Homebrewing System


Retail Price: $299
Homebrewing Rig Style: All In One Homebrewing System
Home Brewing Rig Details: The Brewer’s Edge Mash & Boil is probably the best deal going for an all in one all grain home brewing system.  With the Brewer’s Edge, there is no need for an outdoor burner, complicated brewing system, or even a 220 volt special circuit. The Brewer’s Edge homebrew system plugs right in to any standard 110 volt GFI household outlet. The Brewer’s Edge Mash and Boil’s exclusive double wall stainless construction conserves heat to achieve a rolling boil with only 110 volts and 1600 watts, and its precise thermostat and internal sparging basket lets you mash and boil in the same vessel!

MoreBeer’s Hop Rhizome Sale Going On Now!

MoreBeer hop rhizome sale - Save 30% on Hop Plants

MoreBeer hop rhizome sale – Save 30% on Hop Plants


Limited time and quantity promo code from  MoreBeer.com
Promo Codes for the Month of February, 2017
Coupon Code Date:
2-6-2017 to 2-10-2017
Promotion Details:
 Save up to 30% on Hop Rhizomes
Promo Code:
HOP RHIZOME SALE
Coupon Description
:  Right now More Beer has a sale going on for their hop rhizomes.  If you act now, you can save 30% on a variety of hop rhizomes including sterling, columbus, cascade, centennial, chinook and many more!  These items also qualify for the MoreBeer free shipping offer!

MoreBeer.com Coupon Code Hop Rhizome Sale


How to Build a Kegerator

Guide on how to convert an old refrigerator in to a kegerator #kegerator #guide #howto #DIY

Guide on how to convert an old refrigerator in to a kegerator #kegerator #guide #howto #DIY


For the last several years, I have been using a boring old white refrigerator to store my kegs. Originally when it came time to purchase one, I was just looking for the best deal out there on a refrigerator that could keep my homebrew cold. I have been serving my beer from picnic \ cobra taps that sit lose on top of the kegs in my fridge. A couple of weeks ago I decided to take the keg fridge to the next level and convert it to a full fledged Kegerator with for taps to accommodate all of my kegs. After ordering the beer tap hardware at MoreBeer and taking a trip to the local hardware supply shop, I had everything that I needed to begin my work.


My goal for this homebrewing blog entry is to list out all of the basics of what you will need to conduct the process yourself but I am sure to miss something and if you need any specifics please feel free to ask; I am happy to help if I can.  Please keep in mind that I am not a carpenter, engineer or machinist; so there are probably 10 better ways of doing this, I am just trying to share my experience in case it helps someone else out.


Step 1 – Ordering your gear!
I figured that if I am going to take the time to do this project, I was going to do it right!  Recently MoreBeer started to carry Intertap stainless steel beer facuets – tap, which are basically the Holy Grail of beer taps and the best beer faucets currently available!


Intertap Stainless Steel Beer Faucets, Shanks and Beer Taps! #intertap #beer #taps #faucets #stainless #steel

Intertap Stainless Steel Beer Faucets, Shanks and Beer Taps! #intertap #beer #taps #faucets #stainless #steel


I chose these intertap beer faucets for a few different reasons.  For one, they offered an all stainless steel faucets which is important to me because I want it to last, I want my homebrew beer serving to be as sanitary as possbile and I do not want to be worrying about releasing strange metallic particulates in to my beer like I do when using an old chrome tap that erodes after time. Another great thing about  these Intertap beer faucets is that they are forward sealing and with forward-sealing faucets the faucet keeps beer in it so the inside doesn’t have a chance to get sticky. This makes cleaning your draft beer system far easier. It also reduces the chance of off flavors transferring to your beer while you are pouring. One of the things that sets Intertap beer taps apart from other forward sealing beer taps is that Intertap faucets use a sliding shuttle that guides the internal o-ring into the perfect position every time. The Intertap stainless steel faucets are also modularly designed  allowing you to add helpful items like a ball lock spout, stainless steel growler filling spout and an elongated stout beer spout! They have two varieties of beer faucets in all stainless and 1 features a flow control lever.  I ended up getting one of the stainless steel flow control beer faucet and three of the standard stainless steel beer faucets.


MoreBeer has the best price I have found for Intertap Faucets and they also offer free shipping on any home brewing equipment or supply orders over $59.  Here are links to them as well as links to the anti-microbial beer line which I also highly recommend. Do not forget to pick a shank for each beer faucet, I got the 4″ shanks and they have me plenty of extra room to run them into my refrigerator door.


Intertap Forward Sealing Stainless Steel Beer Faucet


Intertap Forward Sealing Stainless Steel Beer Faucet with Flow Control


Intertap Stainless Steel Beer Faucet and Beer Tap Shanks


Ultra Barrier  Antimicrobial and PVC Free Beer Tubing


West Coast Brewer Beer Tap Handles

West Coast Brewer Beer Tap Handles


For now, I am using chalkboard tap handles, which make it convenient to remind me which beer is on which which tap in case I consume a few too many and can no longer remember. At some point I would like to design a handle for each one of my home brewed beer that I make;  but for now, these look great and are very functional tap handles.  They come in both chalkboard style tap handles and white board dry erase tap handles:


Chalkboard Beer Tap Handles


Whiteboard Dry Erase Tap Handles


Depending on what draft beer equipment you are starting with or if you have anything at all for that matter, there may be a few other items that you want to pick up, such as a CO2 manifold (which permits you to dispence CO2 to multiple beer kegs from one tank or regulator), homebrewing beer kegs, a CO2 Tank and regulator. Here is a link to a great place to start if your are looking for an entire draft beer setup or just random draft beer and keg items:


Draft Beer and Keg Equipment


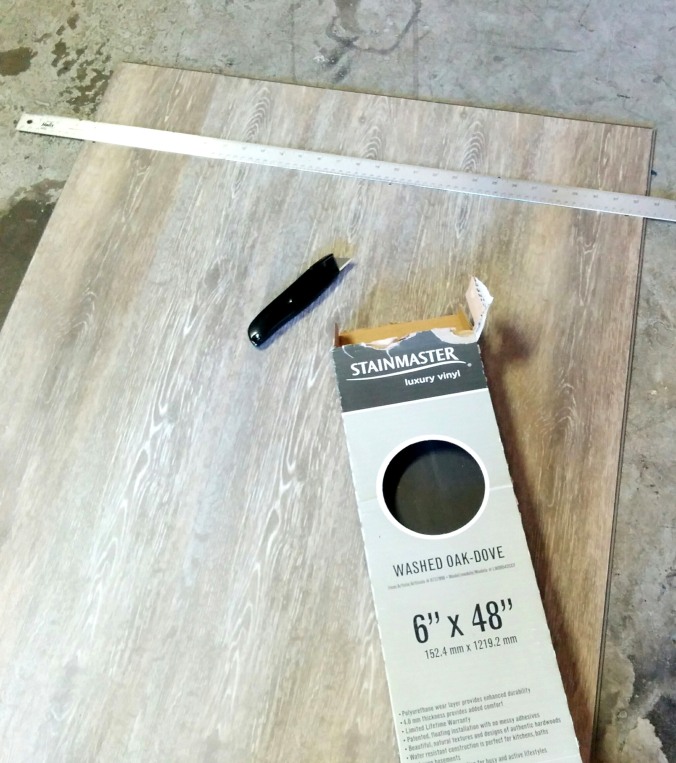
Those were the items that I picked up at MoreBeer, the remaining items I purchased at my local Lowes. I purchased 1 box of Stainmaster Vinyl flooring, which is great because it is resistant to liquid and stains; two things you need to consider when building your kegerator. Normal wood flooring does not do well with moisture so I would recommend avoiding it if possible.

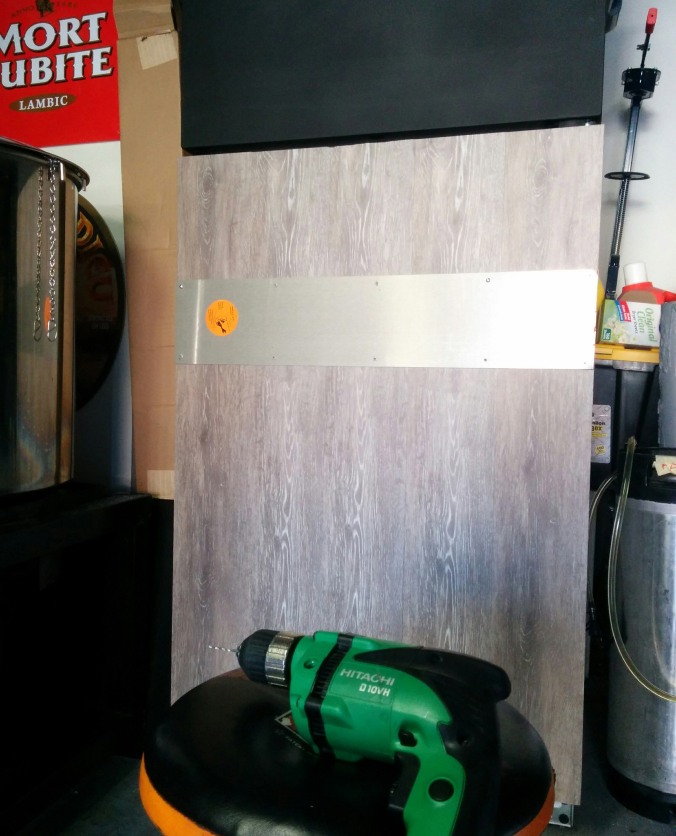
I also picked up a small container of vinyl flooring adhesive, a plastic spreading knife, a razor blade cutting knife (to cut the vinyl flooring), a 1″ drill bill to cut the shank holes for the beer taps, chalkboard spray paint (for the refrigerator upper door), a 3″ wide plank of wood (to make a frame for the upper door), some wood stain to match the vinyl flooring, black duct tape for trim and a brushed aluminum kick plate to put on over the vinyl but under the beer faucets and tap handles.


Vinyl Fake Wood Flooring for my Kegerator Door

Vinyl Fake Wood Flooring for my Kegerator Door


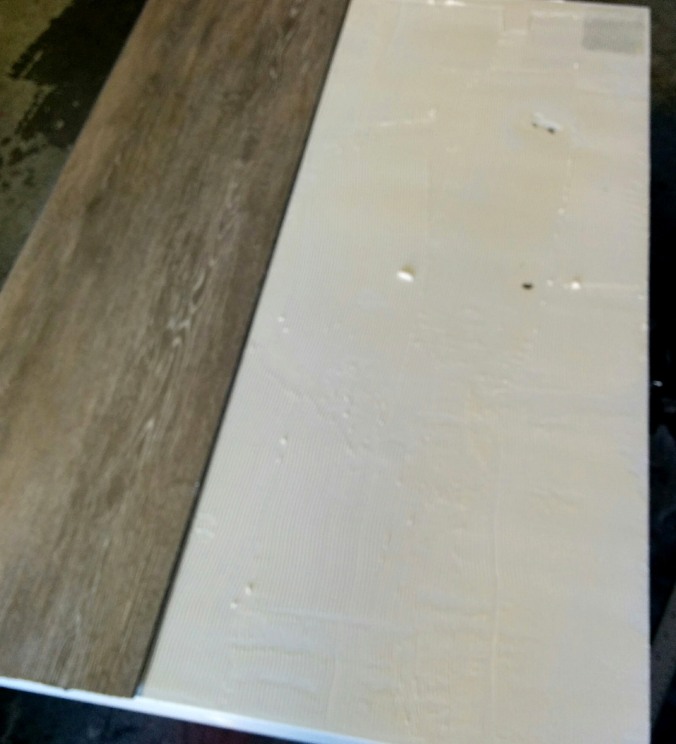
Once you have all of your supplies in hand, it is time to get to work!  I started off my shutting off the refrigerator and giving it a good cleaning. Next I removed both of the refrigerator doors and all of the handles and hardware from the doors. I then sanded the refrigerator doors with a high grit sandpaper to make them more receptive to the vinyl adhesive and chalkboard spray paint. I did not remove all the paint but instead just roughed them up a bit. I then measured and cut the flooring so that it would fit my refrigerator door.  After making all of the needed cuts, I applied the adhesive to the lower refrigerator door. I waited approximately 10 minutes as per the instructions for my adhesive and began to put the vinyl planks in place. I tried my best to mix the planks up a bit so that it did not look to repetitive as can be the case with synthetic flooring.


Placing the vinyl flooring on the refrigerator door.

Placing the vinyl flooring on the refrigerator door.


These Stainmaster vinyl flooring planks were very easy to install. They locked in to place with one another crating a strong bond. After placing all of the vinyl wood planks, I put pressed down on each of the planks firmly and then set it to the side to allow it to dry.  Next I began work on painting the upper door, building the wood frame and preparing the mash paddle door handle for the kegerator.

After giving it a little thought, I figured that I would paint the upper door with a chalkboard spray paint. I was hoping it would add some contrast to the kegerator doors and would also give me the option of adding some notes about the beer being served or allow me to change the appearance of the fridge easily by modifying the drawing on the board. Painting the door was very easy and I gave it two coats of paint.


Chalkboard kegerator door

Chalkboard kegerator door


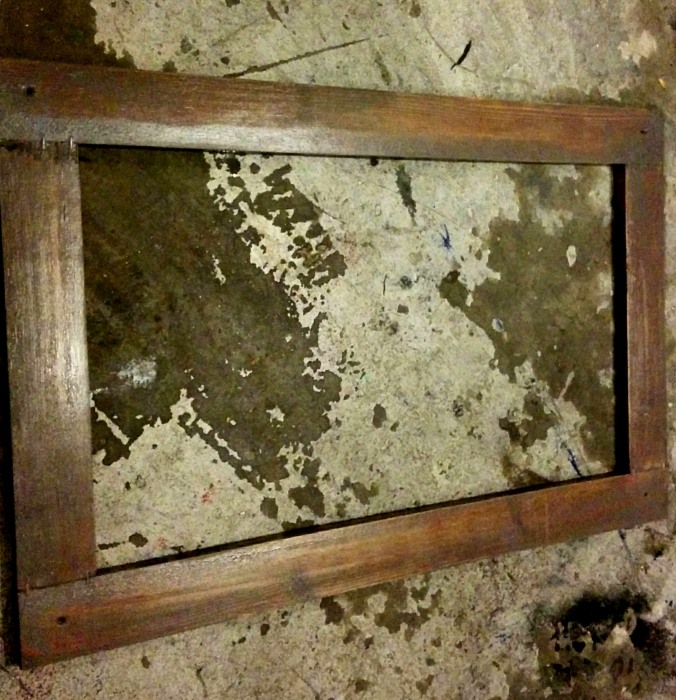
After the upper kegerator door was painted, I began my work on creating a simple frame to give it a border and add some cohesion with the rest of the kegerator. I searched for the cheapest 3″ wide plank I could find at Lowes and had them cut it to the appropriate sized lengths which they are always kind enough to do at no cost. I joined the pieces together with some wood glue and staples. I was going for a rustic look so was not too concerned with any rough edges or the staples showing. I sealed some of the gaps with putty, sanded it down a bit and then stained the wood. Lastly I applied a clear acrylic coat once the stain had dried.


Chalkboard upper door frame for the homebrewing kegerator

Chalkboard upper door frame for the homebrewing kegerator


Next up was crating a door handle for my homebrew kegerator.  I wanted a door handle that said beer and homebrewing when you looked at it! So I decided to use an old mash paddle that I had hanging around the garage. I am really pleased with how it worked out, it is very functional and has the look and feel that I desired for my kegerator. I started by staining the mash paddle to a color that would contrast the wood on the doors but compliment the beer tap handles. I then drilled the mounting holes and used a wine cork as a spacer so that the top of the handle would have about an inch of gap between the kegerator door to make it more easy to open. I used a heavy stainless steel bolt to mount the top of the handle so that it would not pull off the door if one of my buddies starts lifting weights and pull the door open too hard.


Home Brewing Mash Paddle for a refrigerator door handle

Home Brewing Mash Paddle for a refrigerator door handle


Once the kegerator door handle was completed I mounted the doors back on the kegerator after I had verified that the flooring had adhered well enough and the paint had dried. Next I installed the brushed aluminum kick plate to the lower door after measuring it and cutting the excess metal off with a pair of tin snips. I placed the kick plate in the center of the area where I was planning on installing my stainless steel beer taps. I simply drilled it in with screws that would be long enough length to make it into the door but not so long as to pass in to the interior of the kegerator.


Home Brewing Kegerator Stainless Steel Plate for Tap Handles and Faucets

Home Brewing Kegerator Stainless Steel Plate for Tap Handles and Faucets


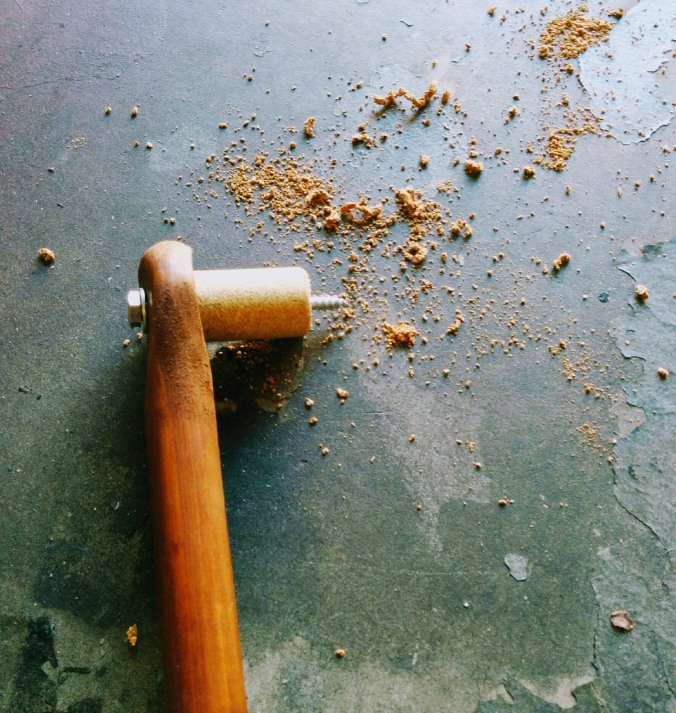
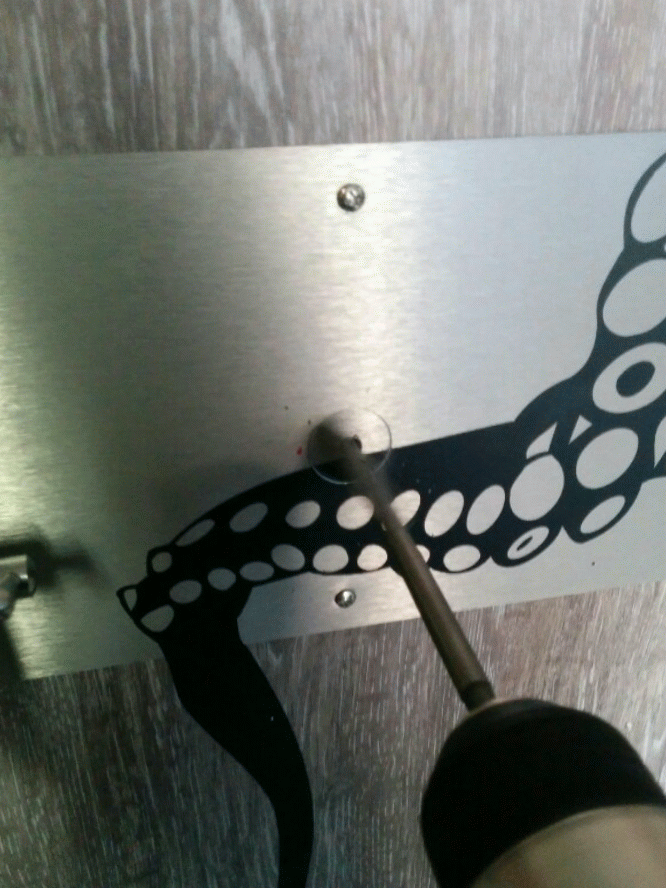
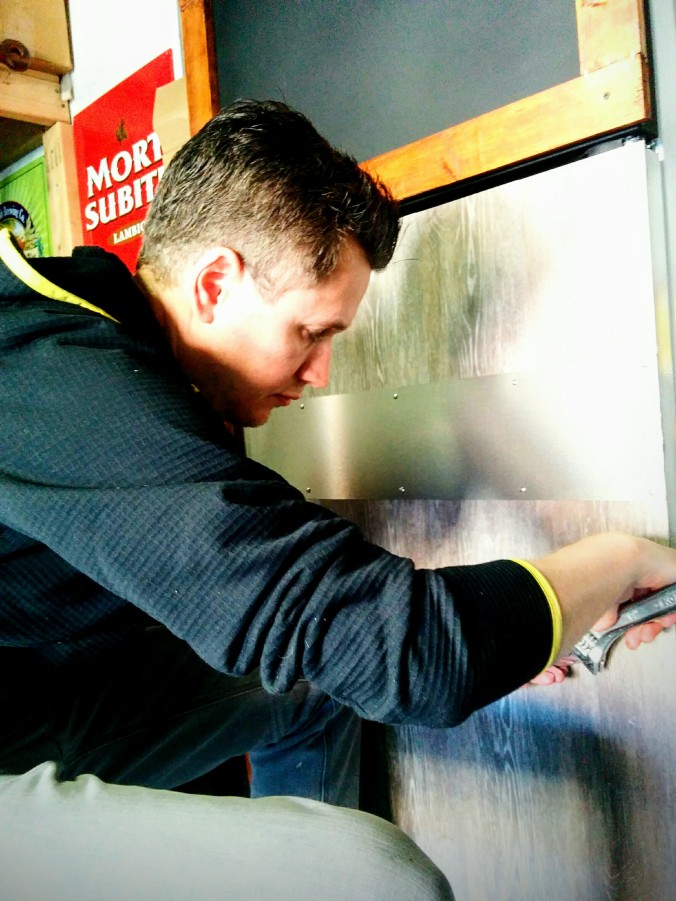
Once the kick plate was installed, it was time to position and install the frame for the upper kegerator door. I drilled some pilot holes and affixed the frame to the upper door with 4 screws. I then mounted the mash paddle kegerator door handle and applied some vinyl squid decals that I picked up online to add a little something different to the kegerator. It was then time to install the beer tap shanks! I drilled pilot holes and used my 1″ drill bit to cut the 4 holes for the stainless steel Intertap tap shanks.  If I had this part of the process to do over again, I think I would have switched drill bits to a 1″ saw style drill bit as I think the holes would have been a little cleaner. On one of the holes that I drilled, some of the plastic splintered on the inside of the kegerator.  It was not a big deal, but could have been better.


How to cut a draft beer tap hole for your kegerator

How to cut a draft beer tap hole for your kegerator


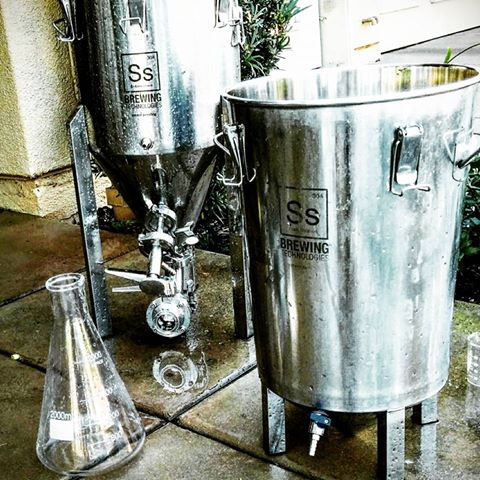
If you are like me and do not have room to fit your CO2 tank in your kegerator and or do not want to store your CO2 tank in the kegerator then you will need to drill a hole in the door to pass the CO2 line.  I did so with a 1/4″ stainless steel pipe and brass fittings. It works well and makes it easy to disconnect from the kegerator door if needed. Eventually I am also going to drill 3 additional holes so that I can connect my SS BrewTech conical fermenter chilling system; but that is for a later homebrewing blog!


Install the CO2 hardware for your kegerator

Install the CO2 hardware for your kegerator


if you are reading this while you are building your own kegerator, at this point all of the hard work is behind you and you are probably ready for a beer! Next clean up the mess that you have certainly created from drilling in to vinyl and styrofoam. Then slide the shanks in to the holes and tighten down the bolts on the inside of the homebrew kegerator.  Once the stainless steel tap shanks are tightened in to place, you can install the beer taps – faucets on to the front of your kegerator. They make an actual wrench specifically for doing this but if you do not have one, you can simply hand tighten them. Next, attach your beer tap handles.  All that is left is to connect the kegs, test for leaks and you are ready to enjoy a nice cold beer!

I really enjoyed this project and my hope is that some of this information will help a fellow home brewer or beer lover. If you have any questions or suggestions about converting a beer fridge in to a kegerator, please feel free to shoot me an email or leave a comment on the blog.


Building a kegerator!

Building a kegerator!

Holiday Homebrewing Sale Extended!

Adventures In Homebrewing Holiday Sale Continues - Save 60% plus Free Shipping Offers

Adventures In Homebrewing Holiday Sale Continues – Save 60% plus Free Shipping Offers


Sale from Adventures In Homebrewing – November  2016
Sale Date: 11-29-2016 to 12-2-2016
Promotion Details: Save up to 60% on Homebrewing Gear
Homebrewing Sale Code: HOLIDAY SALE


Sale Description: The Adventures in Homebrewing Cyber Monday Sale has been extended! is going on now! Right now you can save up to 66% on popular home brewing gear like the GrainFather home brewing system, homebrewing kegs, homebrew grain mills, beer making kits, homebrewing kettles, draft beer towers, draft beer taps and much more! You can also receive free shipping on select items during this Adventures in Homebrewing Holiday Sale


Homebrewing.org Cyber Monday Sale


GrainFather Homebrewing System Promo Code

Grain Father Homebrewing System

Grain Father Homebrewing System

Homebrew Promo Code Date: 11-27-2016 to While Supplies Last
Coupon Details: Save $91 On A GrainFather Homebrewing System + FREE Shipping
Homebrewing Supply Coupon CodeGrain Father Promo Code


Right now you can save $91 on a GrainFather Home Brewery and get free shipping.  The Grain Father makes all grain brewing simple! The Grain Father home beer brewing system is a a high quality all-in-one brewing system making all grain brewing so easy and so simple that even beginning brewers in a tiny apartment will be able to make a quality ale in their own home. It features accurate built-in temperature control, a recirculation system, a telescopic design that allows for mashing/sparging/boiling all in one unit, a false bottom basket, a hop filter, and a quick and easy to use counter flow wort chiller where you’ll pump your chilled wort straight into your fermentor.  Every piece on the Grainfather is thoughtful and constructed with quality. The integrated temperature control module enables accurate temps to be set to within one degree set your mash and boiling temps. The Telescoping design lifts out of the Grainfather so your grain bed is just above your wort where you’ll easily sparge. Ready to boil? a couple of swithes and a quick temperature setting and you’re Grainfather is quickly increasing temperature getting you to boiling temps. Chilling is a breeze with the counter-flow chiller. The GrainFather makes an incredible Christmas Gift for any beer lover!


GrainFather Promo Code


More Beer’s Black Friday Sale!

MoreBeer Black Friday Sale

MoreBeer Black Friday Sale

Promo Codes for the Month of November, 2016
Coupon Code Date: 11-25-2016
Promotion Details: More Beer Black Friday Sale Save Up To 40%
Promo Code: BLACK FRIDAY SALE

Coupon Description:  MoreBeer’s Black Friday sale is going on now.  Today only you can save up to 40% on some of MoreBeer’s best home brewing items including a Blichmann Burner and MoreBeer’s ultimate Homebrewing Sparge Arm! Click the link for all of the details on this Homebrewing Black Friday sale from MoreBeer!


To take advantage of this home  beer brewing promotion, use coupon code listed above if applicable and click on the following home beer brewing promotion link:

More Beer Black Friday Sale


More Beer Veteran’s Day Coupon – Save $25 on Orders of $150+

More Beer Promo Code #homebrewing #homebrew #morebeer #more #beer #promo #code #coupon

More Beer Promo Code #homebrewing #homebrew #morebeer #more #beer #promo #code #coupon


Coupon Code Date: 11-11-2016
Promotion Details: Save $25 On Your $150+ Order at More Beer
Promo Code: SAVE25

Coupon Description: I came across one of those promo codes that I had to share. More Beer is the best home brew supply shop around in my opinion, they have great every day prices but rarely have promotions.  Today they do!  Right now at MoreBeer they are having  a Veterans Day Sale going on that will save you $25 on any order of $150 or more!  More Beer also has free Shipping on orders of that size so if you have been wanting to make a large purchase or pick up a few home brewing kits, this is a great time to do it.  Click on the links for all of the details.


MoreBeer.com Veterans Day Promo Code


Blichmann Hellfire Burner System

Blichmann Hellfire Homebrewing Burner

Blichmann Hellfire Homebrewing Burner

Blichmann HellFire Stainless Steel Home Brewing Burners


Product Description:  The Blichmann Hellfire home brewing burner is the first innovation that I have seen in homebrew gas burners in several years. The Blichmann Hellfire burner is efficient, fast, versatile, dependable and beautiful! This is Blichmann’s newest burner is appropriately named HellFire because of the massive BTU’s that this home brewing burner is capable of putting out. Perhaps what I like best about this new Blichmann Hell Fire burner is its dual mode burner design that give a home brewer the option of running in an efficiency mode at 80,000 BTUs to maintain a rolling boil up to 20 gallons or in a high heat mode that will run at 140,000 BTUs which is perfect for getting that boil going in no time. Anything that will save me time in a brew session is valuable and there is a great deal of time wasted waiting for water to reach mash and boil temperature.


The Blichmann HellFire burner also includes a heat shield to prevent the massive amount of heat from scorching your valve, thermometer and sight glass while directing it to your wort.  The HellFire stand burner bolts right up to our TopTier Modular Brewing Stand if you want to integrate it with your other Blichmann home brewing equipment or can be used independently. Lastly, the stainless steel construction of this burner is a big plus. Stainless steel is the ultimate home brewing material, especially when it comes to burners and kettles. Metals like aluminum, tin and galvanized steel can put out toxic fumes, but stainless steel is fume free and will last a lifetime if cared for!


Here are some of the features on this new Blichmann Hellfire Home Brewing burner.


  • Dual mode capability; high power mode and high efficiency mode
  • 140,000 BTU high power mode and 80,000 BTU efficiency mode
  • Patent pending clip-on heat shield keeps that massive amount of heat off your valve and thermometer and directs it to your wort
  • Infinitely adjustable kettle retaining bars accommodated kettles up to 19.75″ in diameter
  • Non-rusting, fume free heavy gauge stainless frame


Blichmann HellFire burners are now available and you will receive free shipping on your order:


Click Here For The Blichmann HellFire Burners


Stainless Steel Homebrewing Fermenters

Homebrewing Stainless Steel Conical Review

Homebrewing Stainless Steel Conical Review


I own 4 different stainless steel homebrewing conical fermenters at this time:

2 Stainless steeel brew buckets


7 gallon SS BrewTech stainless steel conical fermenter 


14 gallon stainless steel conical fermenter


Prior to purchasing these home brew fermenters I tended to use glass carboys but would also use a plastic carboy on occasion. Often times I get asked if they are worth the money?  For me I can quickly and honestly answer yes! The main reason is they are more durable and I do not have to worry about dropping one of my glass carboys anymore and having it send me to the hospital.  I also got them for a great deal, or at least what I consider a great deal.  I picked the stainless steel brew buckets up for $195 each, the 7 gallon for $395, and the 14 gallon for $495. There are a few more reasons why I like them so much.


They are constructed from 100% stainless steel, so if I care for them they will last a life time. Since these homebrew fermenters are built from metal, it also means that I do not need to worry about light oxidization while the wort or beer is in it. They are incredible easy to clean. If I want to I can transfer via CO2 pressure.  My 14 gallon unit has a temperature control unit which makes fermenting an ale or a lager a breeze regardless of the time of year. My stainless brew buckets and 7 gallon conical fermenter all fit in my fermentation fridge and allow me to ferment about 18 gallons of beer as opposed to 10 gallons if I was still using my glass carboys! Dry hopping these are a snap since their lids come off, which make they a snap to clean as well.  The conicals come with a thermowell built in and the stainless brewbuckets have a add-on kit for them as well; that makes monitoring temperature easy if you have a temp controller and fermentation chamber since it give you an actual temperature reading of the fermenting beer as opposed to the outside of the fermenter or ambient chamber temp which may be off by several degrees.


Filling mt 7 gallon stainless steel homebrew conical fermenter

Filling mt 7 gallon stainless steel homebrew conical fermenter

As you can see, filling the conical is as easy as it gets.  It even has easy to read gallon markers etched into the inside wall of the fermenter.  As you can see there are two ports on it.  One for dumping large volumes from the base of the conical or harvesting yeast (which is simple and can save you some money) and a second transfer and tracking arm port for siphoning beer above the sediment and or yeast bed.


Transferring beer from the stainless steel home brewing brew bucket fermenter.

Transferring beer from the stainless steel home brewing brew bucket fermenter.


As you can see in the above photo, transferring beer from the stainless steel brew bucket is about as easy as it gets. It has a single port and rotating internal racking arm that makes transferring clear beer to the keg as easy as turning a valve.  No more sanitizing siphons with these fermenters. Having less things to worry about or to clean is always a plus when it comes to home brewing.


Home Brewing Conical Fermenters

Home Brewing Conical Fermenters


As I had mentioned earlier, cleaning these fermenters in very easy.  I simply use some PBW, warm water and a nylon scrub sponge.  The lid comes off so it is easy to reach everything and the conical fermenters come with sanitary clamps so they break down and reassemble effortlessly. I have used these fermenters for over 3 years now and still do not have one complaint about them!


If you are interested in picking one up, here are the links and best of all, they are shipped free!


7 Gallon Stainless Steel Brew Bucket $195


7 Gallon Stainless Steel Conical Fermenter $395


14 Gallon Stainless Steel Conical Fermenter $495


The above listed stainless brewbucket is currently on a promotional deal.  It regularly sells for $225, so if you were looking to purchase one then now may be a great time!

Digital Homebrewing Fermentation Monitoring System on Sale!

Beer Bug Home Brewing Internet Based Monitoring System

Beer Bug Home Brewing Internet Based Monitoring System

Limited time and quantity promo code from MoreBeer.com – MoreBeer
Promo Codes for the Month of September 2016
Coupon Code Date: 9/5/2016
Promotion Details: Save $40 on a Digital Homebrew Monitor was $199
Promo Code: BEERDEAL
Coupon Code Description: MoreBeer currently has a coupon code that will save you $40 on a Digital Homebrew Monitor! The Beer Bug is a fantastic piece of homebrewing equipment that measures the actual specific gravity, ABV and even temperature of your fermenting homebrew beer every minute. It then compiles the homebrew data and sends that information to your own free online account. It makes it super easy for you to log on at the TheBeerBug.com or via an internet based app on your phone to see exactly how your fermentation is doing from anywhere! In fact, this homebrewing technology has three graphs that are created for each of your beers to log how specific gravity, alcohol %, and temperature changed over the course of the fermentation. The Beer Bug gives you the knowledge to make better beer and saves you time! Understanding what happens during fermentation, and how to control it, is often what separates good brewers from great brewers. The Beer Bug is the tool that gives you the information you need to know things like if your fermentation temperature inside the chamber is too high or too low, when fermentation is nearing completion so that you can prepare to dry hop, keg or bottle and even what the lag time is on your beer is.


Here are the specs on the Beer Bug, digital home brewing monitor with web interface:

  • Fits just about any fermentation vessel
  • Actual gravity sensor hangs from your BeerBug into your beer and can be lengthened or shortened to accommodate any vessel
  • Sends information via your local WiFi network
  • Rechargeable battery in the homebrew monitor has a 25 day charge life
  • Free account on TheBeerBug.com
  • Easy to setup and configure
  • Android and iOS Apps available for your phone or tablet
  • Software upgrades will automatically be sent to your Beer Bug via WiFi as released

Click Here For This MoreBeer Coupon Code


Found this at: HomebrewingDeal.com

How to Dry Hop Beer and Homebrew


How to Dry Hop Beer

How to Dry Hop Beer


Dry hopping your beer is one of the easiest ways to make a good beer great and is supper simple to do!  At this point I dry hop any Pale Ale or IPA that I brew. It does not make the beer more bitter but instead gives the impression of hoppyness and freshness with fragrant hop aroma. To dry hop your beer, wait until fermenation has completed and CO2 is no longer being generated.  The reason for this is so that the escaping CO2 does not carry away the hop aroma with it because you want those odors to stay in contact with the recently fermented beer.  I use either whole hops or pellet hops for dry hopping but prefer to use whole hops if available.  Depending on the beer I will add between 2oz to 6oz per 5 gallon batch ( I typically go with 2oz, but my Pliny the Elder recipe calls for 5oz). I leave the hops in contact with the fermented beer for approximately 5-7 days and then either transfer to keg or cold crash for another 2 days.  The process is that simple and I encourage you to try it on your next hoppy beer batch.  When you pour your first pint focus on the aroma and if possible compare it to a batch of homebrew that you did not dry hop to see the difference!


« Older posts Newer posts »