West Coast Brewer Home Brewing Blog

Tag: steel

Installed New Blichmann RipTide Home Brewing Pump Upgrades


I initially purchased my March home brewing pumps about 7 years ago, well before stainless steel homebrew pumps were really a thing. Once stainless pumps became more popular, I considered upgrading, but my existing pumps worked fine and I could not justify the cost.  Then Blichmann released their RipTide home brewing pumps which feature a tri-clamp attached head!!! In my opinion that is a big deal because it allows you to easily gain access to the pump cavity for easy cleaning.  As it stood, I had to rely on hot water and PBW to do all of the cleaning unless I wanted to spend an extra 30 minutes breaking down, clean and then reassembling each of my March pumps; which is really not something I wanted to do after a long day of beer brewing.  The one down side was that a new Blichmann Rip Tide home brewing pump will run you $199+. So I waited…..

Then, Blichmann release the RipTide Upgrade Kit! The Rip Tide Upgrade Kit allows you to upgrade some of the most common existing home brewing pumps to a Blichmann Rip Tide, for just $99. With this RipTide Kit, you can upgrade your March or Chugger pump with the Riptide’s Tri-Clamp housing.  The RipTide’s head is made from stainless steel and can rotate 365 degrees to fit almost any home brewing setup. The kit also comes with Blichmann’s  integral linear flow valve, which provides superior control and eliminates the need for an upper ball valve in must situations.


Blichmann Rip Tide Home Brewing Pump Upgrade Kit

Blichmann Rip Tide Home Brewing Pump Upgrade Kit

Here is a list of home brewing pumps that the Blichmann Riptide upgrade kit is compatible with.

More Beer Homebrewing Pumps:

H340, H331, H332, H315HF, H350 and H375

Chugger Homebrew Pumps:

CPSS-CI-1 (115V),CPSS-IN-1 (115V), CPSS-IN-2 (230V), CPSS-CI-2 (230V), CPPS-IN-1 (115V), TCPSS-IN (115/230V) and TCPSS-CI (115/230V)

March Home Brewing Pumps:

809-SS-HS, 809-BR-HS, 809-PL-HS, 809-BR-HS-C, 809-PL-HS-C, 809-SS-HS-C, 809-BR, 809-PL, 809-SS, 809-BR-C, 809-PL-C, 809-SS-C, 815-BR, 815-PL, 815-SS, 815-BR-C, 815-PL-C and 815-SS-C

The Blichmann Riptide Upgrade Kit Can Be Purchased Here for $99


After verifying that the Blichmann RipTide Upgrade Kit would work with my current March homebrew pumps, I place my order for two of them.  After placing my order, it took about 8 days for them to arrive. I purchased them from More Beer, but the pumps were shipped directly from Blichmann.

RipTide Homebrew Pump Upgrade Kit

RipTide Homebrew Pump Upgrade Kit

Blichmann RipTide Upgrade Kit Installation Instructions

Next step was to read the instructions (which were relatively simple), make sure I had everything needed (which was just a screwdriver, a couple of wrenches and some PTFE thread seal tape. The instructions from Blichmann came in black and white and unfortunately the contrast made it so that it was difficult to see where the washer was supposed to go, so I included some color photos here to help you out if needed. I began by breaking down my existing march pump per the instructions and removing my existing fittings.  It is important that you just remove the pump head and NOT the magnet collar! The pump head was held on by 4 stainless steel screws in my case.  Here is an image to help:

Blacihmann RipTide Upgrade Instructions

Blacihmann Rip Tide Upgrade Instructions

Next I mounted my home brewing pump on to the included stainless steel pump riser. This was not required in my situation but I like the idea of it because it raised my pump up a couple of inches, bringing it close to my kettles, reducing the amount of tubing that I needed and giving me a little more space to empty the pumps when I had to clear wort from them.  Everyone’s situation is a little different, but it works well on my home brewing rig.  After that you will want to mount the Tri-Clamp adapter bracket on to your pump.  Blichmann includes two sets of screws to use, so make sure that you select the appropriate screws for your pump. Be careful not to over tighten the screws; doing so could crack the bracket or damage the pump. Next, place the impeller housing and the impeller into the pump magnet as shown in the following images:


Blichmann Rip Tide Homebrewing Pump Upgrade Instructions

Blichmann Rip Tide Home Brewing Pump Upgrade Instructions

Next is where I nearly had a problem.  Install the pump head o-ring and washer to the stainless steel RipTide pump head.  My first kit was missing the washer and the photo quality on the instructions that came with the kit were so bad, I could not tell if I was suppose to use one of the mounting washers.  Something did not seem right and I would have then been missing a mounting washer, so I checked my second pump kit and could see that there was a smaller washer that was intended for the pump head. It thankfully had two in that box, so all was good.  Here is an image to help you see where to place the o-ring and washer into the Blichmann RipTide pump head:

RipTide Upgrade Kit Installation Photos

RipTide Upgrade Kit Installation Photos

Lastly mount the Blichmann RipTide pump head on to your pump using the include stainless steel 3″ Tri-Clamp and attach any fittings that you may have. The entire process took me approximately 30 minutes per pump to upgrade an re-install onto my home brewing stand. Except for the issue with the washer, it was very painless.  Here are a couple of photos of the Blichmann RipTide homebrewing pumps after they were installed on to my homebrewing rig.


Finished Images Of The Blichmann RipTide Pump Upgrade Kit

Blichmann RipTide Home brewing Pumps On My Homebrewing Rig

Blichmann RipTide Home brewing Pumps On My Homebrewing Rig

Close up Image of the Blichmann RipTide Home Brewing Pump

Close up Image of the Blichmann RipTide Home Brewing Pump

After that I tested the RipTide home brewing pumps for leaks and checked to make sure all of the ball valve connections were free from leaks as well.  All was good and I also took a short video in case anyone was curious about the type of pressure or flow rate that you could expect from the RipTide upgrade kit.

Blichmann RipTide Pump Video


If you are looking to purchase a Blichmann RipTide Home Brewing Pump Upgrade Kit, they can be purchased here for $99


Blichmann Hellfire Burner System

Blichmann Hellfire Homebrewing Burner

Blichmann Hellfire Homebrewing Burner

Blichmann HellFire Stainless Steel Home Brewing Burners


Product Description:  The Blichmann Hellfire home brewing burner is the first innovation that I have seen in homebrew gas burners in several years. The Blichmann Hellfire burner is efficient, fast, versatile, dependable and beautiful! This is Blichmann’s newest burner is appropriately named HellFire because of the massive BTU’s that this home brewing burner is capable of putting out. Perhaps what I like best about this new Blichmann Hell Fire burner is its dual mode burner design that give a home brewer the option of running in an efficiency mode at 80,000 BTUs to maintain a rolling boil up to 20 gallons or in a high heat mode that will run at 140,000 BTUs which is perfect for getting that boil going in no time. Anything that will save me time in a brew session is valuable and there is a great deal of time wasted waiting for water to reach mash and boil temperature.


The Blichmann HellFire burner also includes a heat shield to prevent the massive amount of heat from scorching your valve, thermometer and sight glass while directing it to your wort.  The HellFire stand burner bolts right up to our TopTier Modular Brewing Stand if you want to integrate it with your other Blichmann home brewing equipment or can be used independently. Lastly, the stainless steel construction of this burner is a big plus. Stainless steel is the ultimate home brewing material, especially when it comes to burners and kettles. Metals like aluminum, tin and galvanized steel can put out toxic fumes, but stainless steel is fume free and will last a lifetime if cared for!


Here are some of the features on this new Blichmann Hellfire Home Brewing burner.


  • Dual mode capability; high power mode and high efficiency mode
  • 140,000 BTU high power mode and 80,000 BTU efficiency mode
  • Patent pending clip-on heat shield keeps that massive amount of heat off your valve and thermometer and directs it to your wort
  • Infinitely adjustable kettle retaining bars accommodated kettles up to 19.75″ in diameter
  • Non-rusting, fume free heavy gauge stainless frame


Blichmann HellFire burners are now available and you will receive free shipping on your order:


Click Here For The Blichmann HellFire Burners


Stainless Steel Homebrewing Fermenters

Homebrewing Stainless Steel Conical Review

Homebrewing Stainless Steel Conical Review


I own 4 different stainless steel homebrewing conical fermenters at this time:

2 Stainless steeel brew buckets


7 gallon SS BrewTech stainless steel conical fermenter 


14 gallon stainless steel conical fermenter


Prior to purchasing these home brew fermenters I tended to use glass carboys but would also use a plastic carboy on occasion. Often times I get asked if they are worth the money?  For me I can quickly and honestly answer yes! The main reason is they are more durable and I do not have to worry about dropping one of my glass carboys anymore and having it send me to the hospital.  I also got them for a great deal, or at least what I consider a great deal.  I picked the stainless steel brew buckets up for $195 each, the 7 gallon for $395, and the 14 gallon for $495. There are a few more reasons why I like them so much.


They are constructed from 100% stainless steel, so if I care for them they will last a life time. Since these homebrew fermenters are built from metal, it also means that I do not need to worry about light oxidization while the wort or beer is in it. They are incredible easy to clean. If I want to I can transfer via CO2 pressure.  My 14 gallon unit has a temperature control unit which makes fermenting an ale or a lager a breeze regardless of the time of year. My stainless brew buckets and 7 gallon conical fermenter all fit in my fermentation fridge and allow me to ferment about 18 gallons of beer as opposed to 10 gallons if I was still using my glass carboys! Dry hopping these are a snap since their lids come off, which make they a snap to clean as well.  The conicals come with a thermowell built in and the stainless brewbuckets have a add-on kit for them as well; that makes monitoring temperature easy if you have a temp controller and fermentation chamber since it give you an actual temperature reading of the fermenting beer as opposed to the outside of the fermenter or ambient chamber temp which may be off by several degrees.


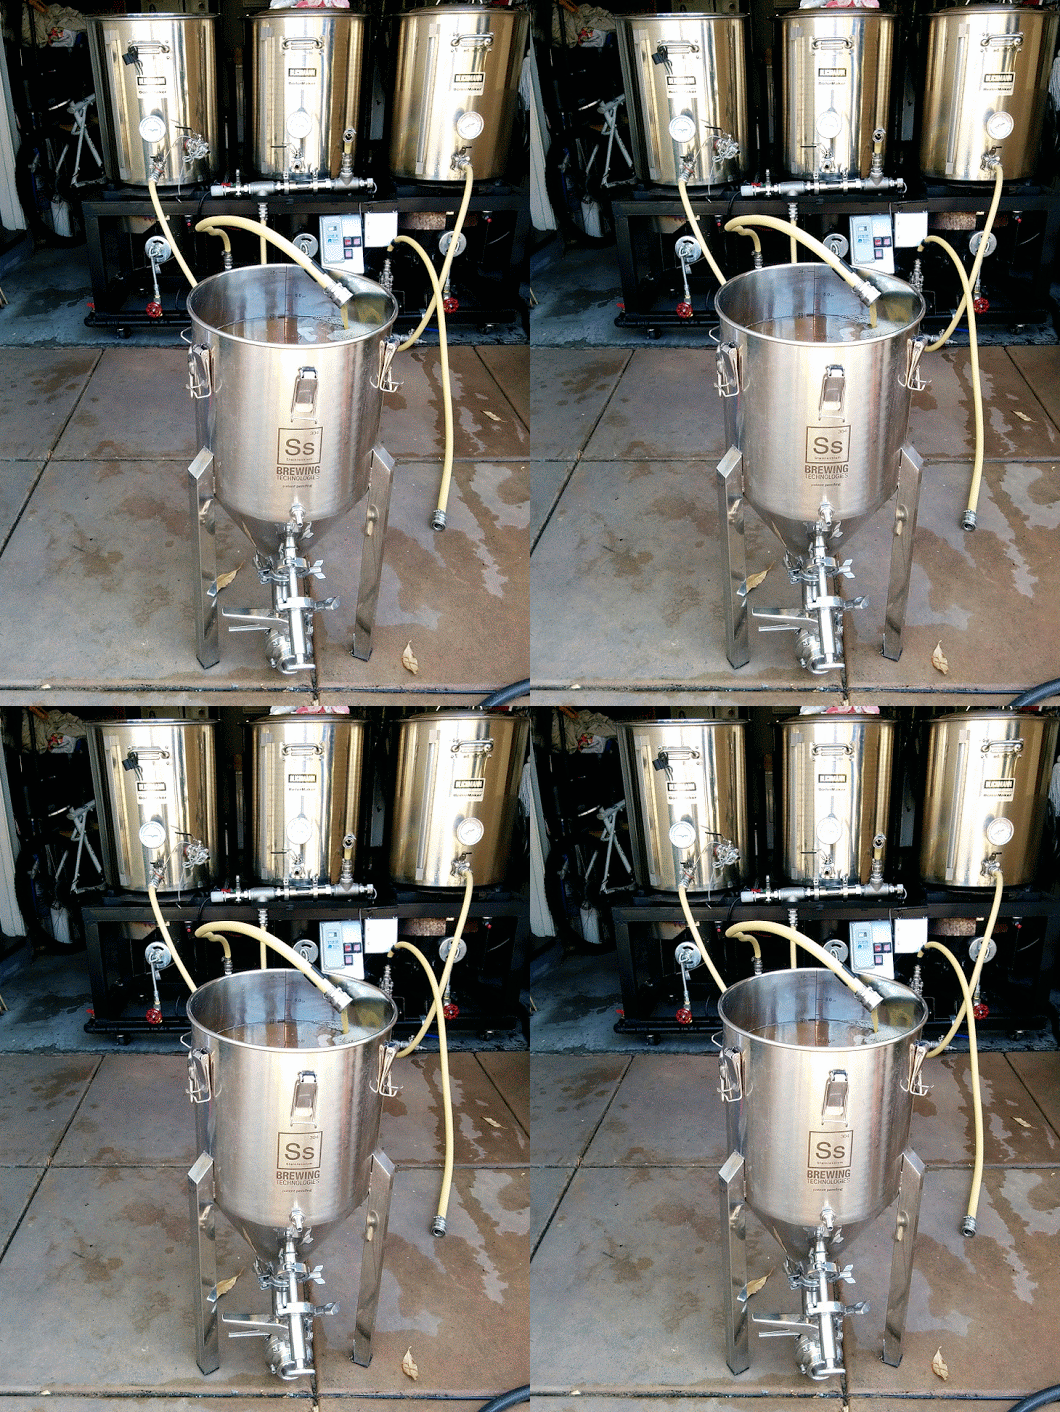
Filling mt 7 gallon stainless steel homebrew conical fermenter

Filling mt 7 gallon stainless steel homebrew conical fermenter

As you can see, filling the conical is as easy as it gets.  It even has easy to read gallon markers etched into the inside wall of the fermenter.  As you can see there are two ports on it.  One for dumping large volumes from the base of the conical or harvesting yeast (which is simple and can save you some money) and a second transfer and tracking arm port for siphoning beer above the sediment and or yeast bed.


Transferring beer from the stainless steel home brewing brew bucket fermenter.

Transferring beer from the stainless steel home brewing brew bucket fermenter.


As you can see in the above photo, transferring beer from the stainless steel brew bucket is about as easy as it gets. It has a single port and rotating internal racking arm that makes transferring clear beer to the keg as easy as turning a valve.  No more sanitizing siphons with these fermenters. Having less things to worry about or to clean is always a plus when it comes to home brewing.


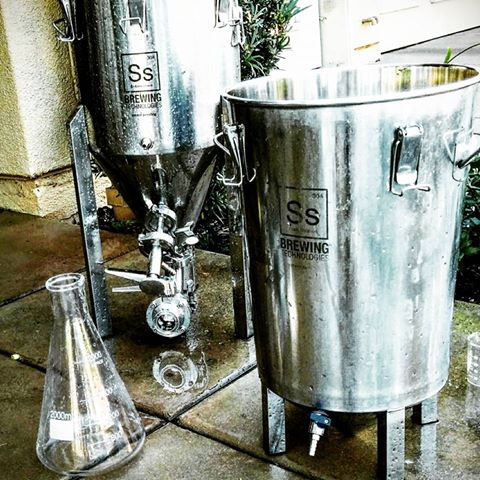
Home Brewing Conical Fermenters

Home Brewing Conical Fermenters


As I had mentioned earlier, cleaning these fermenters in very easy.  I simply use some PBW, warm water and a nylon scrub sponge.  The lid comes off so it is easy to reach everything and the conical fermenters come with sanitary clamps so they break down and reassemble effortlessly. I have used these fermenters for over 3 years now and still do not have one complaint about them!


If you are interested in picking one up, here are the links and best of all, they are shipped free!


7 Gallon Stainless Steel Brew Bucket $195


7 Gallon Stainless Steel Conical Fermenter $395


14 Gallon Stainless Steel Conical Fermenter $495


The above listed stainless brewbucket is currently on a promotional deal.  It regularly sells for $225, so if you were looking to purchase one then now may be a great time!

New Homebreiwng Device Called The Trub Trapper

Trub Trapper Homebrewing Screen

Trub Trapper Homebrewing Screen


Every now and then a new homebrewing product comes out that catches my eye and I say, I can not believe nobody had thought of that. The Trub Trapper is one of those home brewing equipment idea.


So what is the Trub Trapper and why is it so great? Well, lets start by talking a little about trub first. Trub is that thick sludge left at the bottom of your boil kettle after you have transferred your wort to the fermenter.  It is a combination of hops, compounds, proteins and solids left over after the boil. The problem is that it is very difficult to stop the trub from passing in to your fermenter. Trub formed during the boil can adversely affect fermentation and produce undesirable flavors and haze in your finished beer. It is something that you want to avoid if at all possible and I will explain further in a couple of paragraphs. You worked to remove these unwanted compounds and byproducts during the boil so you do not want to allow them in your homebrewing fermenter.


How does the trub trapper work? Well, it is pretty simple really, you place the TrubTrapper in the bottom of your home brewing kettle so that your brew kettle dip tube is outside the tub trapper ring before you fill your boil kettle. You conduct your boil as you normally would and then whirlpool post boil.  Let the wort settle for approximately 10 minutes and you are ready to go. It is that simple.  The high temperature soft silicone gasket and overall weight of the TrubTrapper will keep it in place during the boil and whirlpool so there is no need to re-position, or try and unclog anything.  A small amount of the overall trub will settle outside the trub trapper filter ring during the whirlpool process, and a portion of that will flow in to the fermenter but the grand majority of the trub will be trapped inside the trub trapper which is where you want it.


The TrubTrapper

The TrubTrapper


Why is trub transferring in to your fermenter such a bad thing? Well, excessive trub can coat yeast membranes impeding transport in and out of the cells which encourages metabolic by-products.  Not to mention fine particulates in trub can lead to haze formation in your finished beer. Trub can also be responsible for head retention issues, impact aroma, flavor stability and off flavors such as sulfur, harsh bitterness and soapy notes.  If you have been experiencing any of this in your home brew then the trub trapper may be exactly what you are looking for.


If you like to reuse your homebrewing yeast, the trub trapper can help with that too. Excessive trub affects your ability to harvest and re-use yeast effectively and efficiently.  High trub levels make it more difficult to collect and clean the yeast and poor yeast health caused by excessive trub eliminates the ability for you to maintain the quality of your yeast which impacts the quality of your beer!


So how much is the trub trapper and where can I get it? It runs for about $50 and you can find the TrubTrapper here!

Stainless Steel Conical Fermenters for $395

Stainless Steel Conical Homebrewing Fermenters

Stainless Steel Conical Homebrewing Fermenters


Rejoice home brewers, right now you can pick up a high end SS BrewTech 7 gallon stainless steel conical fermenter for just $395! These are high end and well build stainless steel conical homebrewing fermenters, not some Alibaba knock off with leaky valves.


Here are some of the standard features on this conical fermenter:

  • Certified Food Grade 304 Stainless Steel Construction
  • Patent Pending Stainless Steel Rotating Racking Arm
  • 7 Gallon Capacity
  • 1.5” Tri Clamp bottom with Elbow and 3 piece Ball Valve
  • Stackable design minimizes footprint and maximizes ferment space!
  • Molded Silicone Gasket for airtight Lid seal.
  • Six Spring-Loaded Lid Clamps hold Lid in place
  • Volume Markers inside for easy volume assessment
  • TIG Sanitary Welds – Easy to Clean, Long-lasting!


Click Here For the 7 Gallon Stainless Steel Fermenter


These stainless steel conical fermenters are loaded with features and I personally have two of them, a 7 gallon and a 14 gallon. I also have 2 of their 7 gallon brew bucket stainless steel fermenters which are also great.  In my opinion they are the best fermenters out there for the money.  I would recommend upgrading the racking arm on the unit to the MoreBeer Racking Arm system which you can find here for $75 and is shown in the above image on my fermenter.


I cut down the legs in this 7 gallon conical fermenter so that it could fit in my fermentation chamber / chest freezer. My 14 gallon conical fermenter has an internal temperature control system.  The 14 gallon unit is currently on sale for $495 and is available here.


7 Gallon Conical Fermenter

7 Gallon Conical Fermenter